 App Store Optimization: An Introduction and the Benefits
App Store Optimization – also referred to as ASO, because that is a really long thing to type out over and over – is a similar process to on site Search Engine Optimization. You can’t get backlinks to your app page – technically you can but that won’t help people searching inside of the app store to find your app. On a fundamental level, ASO is simply choosing keywords, making sure your app description and screenshots look good, and getting good reviews. For those of you who don’t like to read, BAM! you are done, go do something else. For those of you who want more information on doing your ASO, you are in the right place.
Just like SEO, ASO is actually a really deep topic. Sure there are the easy answers I gave above, but to really make sure your app is found organically by the people you want to find it, you need to put some real time and thought into your ASO, but first – we’ll start with the good stuff. You really came here to know what the benefits are right?
Me, Me, Me. It’s all About Me and my Benefits
If you haven’t already figured out why you need ASO, the biggest benefits from taking the time to do proper ASO means more traffic, higher conversion rates, and better user experiences. If you do all of the things described here, you can get all of these things. Have I got you hooked yet? Do you understand why ASO is important? If so, go on to the next section. If you need an example of what not to do, keep reading here.
When I launched both of my first two apps, I did very little ASO. I basically just followed Apple’s advice on what information should be in your description. I took screen shots of what I felt were the major parts of my app.
I picked keywords that described the app, but didn’t spend any time doing research into these, or jazzing up my screen shots. I also didn’t make app preview videos for either of them. Both of my apps launched, and due to being pretty good apps, that solve real issues that many people have, they both received a steady download rate, at first, of about 15 a day, then petering off to about 5 a day after a week or two.
Needless to say, this is quite underwhelming, though some apps don’t even do this good – usually because the app itself isn’t up to snuff. I recently learned not only how important ASO is, but how to do it correctly. Now I am going to pass this information on to you.
Ok, I Need ASO, But How Do I Make it Happen?
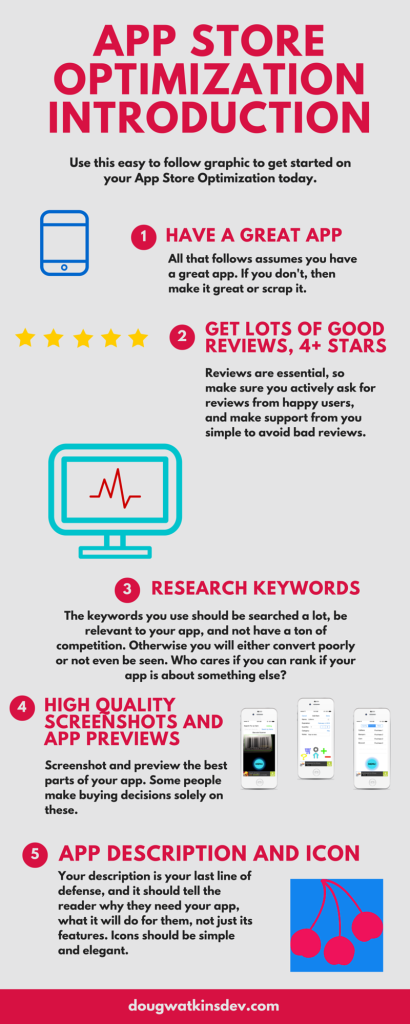
First off, pat yourself on the back. You have made an important first step in getting your apps in front of more people, who are more interested in your app to begin with. Now I’m going to show you the list of things you need to make sure are done right – and this might take some time, but oh man is it worth it! The checklist, in no particular order, is:
[list icon=”check-square-o” font_size=”16″ icon_color=”00ff00″ text_color=”1155ff” columns=”1″ bottom_margin=”10″]
- The app has to be great
- Reviews are super important
- Keyword research and usage
- Screenshots and App Preview
- Description and Icon
[/list]
 The App Has To Be Great!
Hear that? Not ok, not even good. It has to be GREAT. If the app isn’t great, and people don’t have a wonderful experience using the app, then part 2 will be affected negatively. Also, I don’t know how much of this is true, but supposedly Apple and Google watch for usage signals in determining app rankings. And truthfully, whether that is true or not doesn’t matter to me, if the app is getting used once and deleted, then don’t expect anyone to download it, or to make money from it.
If your app is great, part 2 is easier to accomplish. If your app is great, and people truly enjoy using the app, they will share the app with their friends. You will get more users because those that already have it will sell the app FOR YOU!
Loyal users are worth their weight in gold, platinum, silver, $100 bills, and anything else precious you can think of. Not only will they sell this app, but probably get your future apps as well. You can only get this type of user with a great app. So before you spend time and money marketing an app, make sure it is great. If not, either fix it and make it great or just scrap it.
Another thing kind of related to your app being great that will help with downloads, though only in spikes, is to provide some way for people to share your app socially. Believe me, you can figure out a way for people to share your app in a positive way, increasing the eyeballs on your app, as well as creating a sense of community about your app. This is well worth the effort to help people tweet or share something about your app easily on their preferred social media platform.
For help coming up with brainstorming for an app idea, and then making a great phone app see these posts.
Getting Reviews to Convert and Increase Usage
Just having positive reviews will not only increase conversion rates – the percentage of people that actually download your app once they have landed on it – but people will already be excited to use your app before they have even finished downloading it. Their user experience is already better because of your reviews. If your app is truly great you will probably naturally get some good reviews, but this is unlikely to be enough.
People are looking for at least several good reviews, and a 4+ star rating. You need to make sure that the people who love your app are being asked to review the app. You also need to be putting effort into solving problems people have so they don’t leave bad reviews.
First, Asking For Good Reviews
You need to implement the good and bad review sections at the same time, so the “First” part of this is only because I have to start somewhere.
Pick a place in your app that people will have had to use the app extensively before getting to it. In Go Coder, this happens to be at the end of a tutorial. If somebody has reached the end of a tutorial series, they have spent a significant amount of time on my app, and probably have enjoyed it. Since they can get the first tutorial for free by tweeting about the app, they don’t even need to have skin in the game to get to this point.
Once they open the final tutorial in a series, I start a timer – 30 seconds to be exact – to make sure they have some time to read that page, it is just a congratulations page, before I put up an alert. In my alert I make sure to do a couple of things:
- I ask them if they enjoyed the app and wouldn’t mind leaving a review. I make sure they know it will be quick and easy and provide a button to review which takes them straight there.
- I have another button that is for people not interested in reviewing right now. This puts them back in my queue to ask again later.
- I have a third button that links to my support stuff on the app – I have an email button, a Facebook page button, and a twitter button. All 3 options are easy ways for someone to get into contact with me and get help fast.
- Lastly I have a I don’t ever want to review you button. This takes away the prompt and doesn’t prompt again. If someone clicks this they probably won’t give me a good review so I don’t want to ask them again.
Having the review button and the support button are must haves. Fixing peoples problems helps mitigate bad reviews, and asking for reviews from happy people increases positive reviews.
Second, Support Options That Are Easy to Use
When someone goes to leave a review, Apple has a contact support button that shows up. That is the last line of resort for fixing problems. By the time people get to write a review, they are already set on what they want to say.
You most likely won’t ever see that button clicked, but you might so it needs to be there and you need to have something legitimate on the other end of that button. I had an app that I left a bad review for because I clicked the button and went to the apps sales page, with no information on the page about how to get support. They got a worse review than I was going to give for that one reason.
You need to make it EXTREMELY easy for people to get in touch with you. Include email, support requests, social media links, ANYTHING that they could possibly use to contact you for help or questions or bug reports or even just to complain. This will go far in helping your rating stay positive and keep bad reviews out of your apps reviews. The more places people can find these options, the better.
Keyword Research and Usage
For those familiar with SEO, you will recognize this term, and even have a good idea where to start. You can use the Google keyword research tool to see exactly how many people are searching for, and how flooded the market is for, a given keyword. The only problem is that this only helps people looking for your app through Google. Not Google play, but straight up Google search.
Neither Google nor Apple release their search traffic information – nor do they release their search algorithms. So the best we can do is guesstimate – which you can use the Google keyword research tool to do – or you can use something like AppAnnie, or SensorTower, to do some research. The thing that is great about these tools is that, if you already have your app in the store, they can not only show you approximate traffic for your keywords, but can suggest keywords to use, and even show you where you rank for these keywords.
First you need a list of possible keywords to look into, so write down everything your app can do. Next, look for synonyms – words that mean the same thing – for each of these and write down any words that make sense, they won’t all make sense. Now look at how much traffic those words get, and how many apps are ranking for each of them. This can lead to some interesting nuggets of opportunity.
For instance, My Food Storage was ranking for pantry, because it tracks what is in your pantry. But a synonym of pantry is larder – many people don’t even know what this word means, literally: The place you store food, pantry is a more specific term for larder. Larder has, at the time of this writing, about 7 apps ranking for it. Talk about low hanging fruit. According to SensorTower, larder is searched for almost as much as pantry, but has almost nobody ranking for it. BAM! I’ve just increased my reach.
Side Note: Because of the nature of this site I am willing to tell you this information – nobody else will. Keywords are trade secrets. Revealing what keywords you are ranking for is a great way to have a competitor outrank you. That being said, the whole point of this blog and the training that will come through it is transparency, so I will release information like keywords, traffic, downloads, and revenue so that those following me can see exactly how well things are working.
Now that we have the research down, and have a list of keywords to use, we need to put them somewhere important. If you are an Apple developer, there is a keyword field to fill out when creating your app in iTunes Connect. Android devs don’t get this feature, but your description matters more than it does for Apple.
For Apple, make sure you use your keyword box to its fullest extent. Don’t do a singular and a plural version of a word, pick one – you will rank for the other. Don’t use spaces, they are unnecessary and cutting them out will almost certainly get you another keyword or two in your list. Use as many characters as you can, if you have more than 4 characters left, find another word that will fit – even if you don’t plan to rank for it, who knows what traffic you might get for it.
One place both stores have, is the title of the app. This place is super important to have your keywords, BUT Google is limited by number of characters to use, and Apple will reject your app if your title is keyword stuffed – it happened to me last week. They want your title to closely match the name that is shown on the screen of your app. So doing your keyword research before naming your app can be powerful – Sensor Tower even lets you see what keywords competitors are likely using and ranking for. Using a keyword as your name will be a powerful thing.
After you have your title and keyword box figured out, you need to make sure that your major keywords are also in your app description, but don’t focus on stuffing keywords in there! Write the description for your users and only add keywords if and when it makes sense.
Lastly, you can update your keyword lists, and title, whenever you submit an update to your app, and you should tweak your keywords each time. Look at your app’s keywords history, which keywords are you ranking well for and have high traffic? Pick your lowest performing keywords and change them out.
 Screenshots and Your App Preview
Your screenshots, at least for Apple as I am not an Android developer yet, must be exact sizes of the screen for which you are uploading. Apple says not to add content to your screenshots, to just use straight screenshots, but it seems to help conversions to have a little description of the screenshot if you add a little to it.
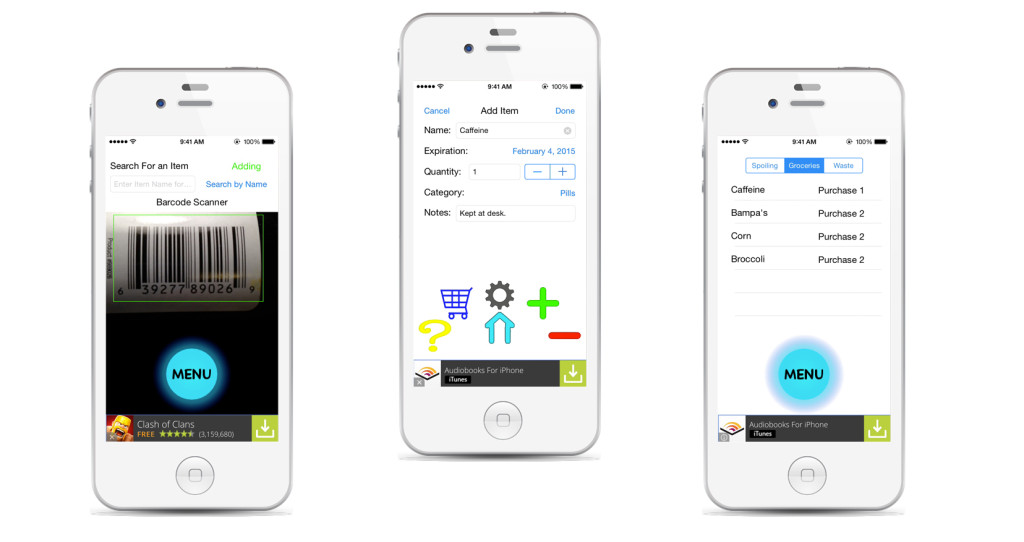
Also be careful about putting the screenshot inside of a picture of an Apple device. Apple might reject such a screenshot. Also, as you can see from the screenshots I’ve included from My Food Storage, they can become outdated quickly – Apple stopped putting the little square in the home button with the iPhone 5. My suggestion is to not show anything below the bottom of the screen – meaning the area where the home button is. Apple is super protective about their image and will not hesitate to reject something that looks like an Apple product.
Take the time to make sure your screenshots look good. Hire someone if you need to – actually this is my recommended option but I understand not having money to hire out design work. Show off your app with your screenshots. Many people won’t read your description at all and will base their choice to buy solely on your screenshots, make them as good as you can.
I’m not aware if Google does App Preview’s or not – 30 second demo videos with your screenshots – but if they don’t, you should still do it and just post it to YouTube to possibly get some traffic to your app. Again, like with the screenshots, show off your app. You only have 30 seconds which is really not a whole lot of time, so pick the coolest thing your app does and record it. For Apple devs, you should have a mac computer already for the dev process so you can use quicktime to record your phone, or you can look up software out there on the Google machine to do this in an easier format.
Again, production value is key – though don’t worry about spending a ton of money on your video, just make sure it doesn’t detract people from wanting your product. Most apps don’t have videos yet, so having one can put you ahead of your competition.
App Description and Icon
![]() Last but not least is your app description and app icon. The app icon is going to be the first thing prospective users will see. It needs to be simple. It needs to explain at least part of what your app does – between it and your title people should have a good idea of what your app is used for. It needs to help you stand out from everyone else. It needs to look clean – lots of things going on is a cluttered look that doesn’t help sell.
Last but not least is your app description and app icon. The app icon is going to be the first thing prospective users will see. It needs to be simple. It needs to explain at least part of what your app does – between it and your title people should have a good idea of what your app is used for. It needs to help you stand out from everyone else. It needs to look clean – lots of things going on is a cluttered look that doesn’t help sell.
For examples you can look at my apps, their logos are both on the homepage of dougwatkinsdev.com, but more importantly I would look at what Apple and Android are doing with their icons. Look at the included apps on your device, and see how they look. You want your icon to look similar to theirs, but also noticeably different. If you icon looks EXACTLY like the iTunes icon, you will get rejected – people won’t know which app is which and Apple is SUPER protective over their stuff. You want to use the ideas behind their icons, not the icons themselves.
Pick 2 or 3 colors. Use straight lines. Don’t put much on the icon. Keep it simple and it will look professional and attractive.
The app description might be one of the last things you do, but it is still super important – anybody who has found you, seen your icon and title, looked through your screenshots, and is STILL on the fence will need your app description to convince them that this app is for them. Describe what your app can fix for them. What are your users experiencing that your app can help with or make better? Figure out how your users will be benefited by using your app then put these things there. The benefits of using your app need to come first. Then you can list features.
Lastly, make sure to include your keywords that make sense where they make sense. If they don’t make sense anywhere, it is probably a bad keyword to have – though not necessarily – but don’t force keywords into your description. It will be obvious and will drive people away. The app store does use the description at least a little to determine if your app is related to the current search term.
Now, using App Store Optimization, you should be getting better traffic to your apps, as well as give your users as much incentive as you possibly can to download your app.
Did I miss anything? Have something to say? What strategy have you used or seen that caused the biggest gains? Comment below and let me know! I look forward to reading it.
If you like what you see and want to keep updated, as well as be informed about when I release new freebies, sign up for my newsletter below for more tips and advice on growing an app business.
- CodeFights and Re-Learning About Bit Manipulation - October 20, 2016
- Firebase Account Creation Failure Without an Error - October 13, 2016
- Using Kickstarter to Vet an Idea - June 1, 2016


![[Google]]( https://dougwatkinsdev.com/wp-content/plugins/easy-adsense-lite//google-light.gif)
