Why I Decided to Use Firebase, and an Interesting Error I Got Because of 3 Characters
Before I get into the Firebase error I got, or more appropriately the error I didn’t get but should have gotten, lets discuss why I chose Firebase in the first place.
I recently decided to use Firebase to do authentication and database storage for a few apps I am working on. Both for myself and some freelance clients. Firebase was my choice for three reasons:
The backend for the auth and database storage is already done and well tested.
I planned to sell the apps, so paying money for Firebase if I go over their free limits isn’t a big deal.
Parse is no longer an option. I had been planning to use it for these apps for a while and was disappointed to find out it was being discontinued.
While researching Parse alternatives, I came across a tutorial on Ray Wenderlich’s site, and became intrigued by Firebase. Finding out it was a Google product increased my interest, since in my experience Google puts out fairly good products.
So, after doing a little research, I decided upon Firebase and set to work creating an abstract project. Once done I’m turning it into a framework, and then a cocoapod, for use in future apps. This app would do user login/authentication, user account creation, password reset requests, and database communication.
My Journey With Firebase
First I started working on the sign in screen and user creation screen.
The UI is pretty simple for both. It is just a series of TableViewCell’s with text inputs used to create, or sign in to their account. I had to add some extra inputs on the creation screen because I want to add new users to my email list unless they opt out.
Because I planned on the entire project being used for multiple projects in the future, it was fairly simple to abstract everything out and make the data collected by the app adjustable by simply changing certain constants all contained within a specific file.
Now that I have everything abstracted, but also concrete by setting the specific constants to what I plan to use for several apps, I was ready to finally test creating an account. Once I had an account created I could start testing the login screen – an important thing to note here is that I didn’t want to create an account through the webpage console for Firebase, I wanted to do it solely through the app … remember this point because it become significant.
Testing the Account Creation
So, I’m ready to go, run the app click the account creation button, and fill out the form.
Because I am doing this on my phone, I really dont want to type all my actual information out. So I used strings like “asd” for both names – the name fields were just random letters. The email was “doug@doug.com” because it was quick and much easier to type than my real email.
The last part of the form is a password which I didn’t want a full, long, real password for testing, so I used “bim” because it was short and I could remember it.
I finally clicked “Create Account” and waited for the magic, which never happened.
Dang! Now I get to pore through documentation and find out whats going on.
What Went Wrong, and What I Did to Fix it
Usually the Google machine and Stack Overflow keep me going. If something doesn’t work, they almost always have the answer. This moment marks the second time I’ve been let down by the two of them. Though SO did eventually rescue me from the first one, but I had to actually ask a question instead of just search through answers.
Firebase documentation states specifically that if there is no error returned by the create account call, then the account was created successfully. The only problem was I was getting no error, nor was the account being created! I FRIGGIN BROKE FIREBASE!?!?!
Almost, but not exactly. After searching for multiple hours for a solution, and finding zero helpful information, I accidentally stumbled upon the problem. I tried to create the same account on the website – the thing I wanted to avoid doing – and got a freaking error.
What The Crap Google! Here I am not being sent an error – but the website is throwing an error. Everything was the same on the app and the website.
So, what went wrong you may be asking yourself … The password was the problem.
Firebase Password Documentation
The Firebase docs say that any password authentication needed to be done by me before creating the account. For these particular apps I am currently working on, I really don’t care if people use a 1 character password – so I assumed that since it was left to me, there were no restrictions placed by Google, but there are.
Firebase passwords must be 6 characters or more. This is the error message I finally got while trying to create a password online. Tried this in the app and bam, works like a charm.
Why oh why does this not throw an error – or at least have a mention in the documentation somewhere. I am actually going to write Google about the issue and ask them to update the documentation or cause an error to be thrown by the app.
In the meanwhile I am putting this here – as well as Stack Overflow. That way any other unsuspecting people can find a possible solution to their problem.
If you like what you see and want to keep updated, as well as be informed about when I release new freebies, sign up for my newsletter below for more tips and advice on growing an app business.
I recently finished a Kickstarter campaign. It was a success, at least in terms of becoming funded and getting potential users to help give me input … I’m getting a little ahead of myself so maybe we should back this up to the beginning.
Why I Chose to Run a Kickstarter Campaign For My Next App
I am trying to not only get myself to self reliance and profitability through making mobile apps, but I am also trying to bring those who follow me along for the ride. As such, I want to know what you and my other subscribers want to know, or what pieces of the puzzle you are missing.
So I ask all my subscribers what they want to know more about, and some people have gotten back to me. A intriguing question I’ve received involves conducting market research for an app, specifically pertaining to what features and such your target users want to see in their app.
So I started doing research into the subject, and found that there isn’t much out there about doing this. I did find some information, which I will include in my final write up on the subject – check back later.
So since the information I want isn’t available, I thought about how I would go about getting such information for my own apps; and I’ve been thinking a lot about running a crowdfunding campaign for various other reasons – funding, idea plausibility, user interest, list building, etc… – so I put the two together and ran an experiment.
I’ll talk more about the experiment in a later post – I’ll include a link here when it goes up – but it was/is basically an experiment in pricing, user acquisition, user experience, requirements generation.
That being said, when the entire process is finished, there will be a whole huge write up on the entire process, but in the meantime I plan to get smaller updates out to you all about how the process is going so far.
Doing My Homework
Just because structured schooling is behind me – unless I go for a masters, which I won’t say won’t happen – doesn’t mean I don’t still have homework, it is just now a part of my work. You could just as easily replace the word homework with research – that’s what they call it in college to make it sound more important, yay for euphemisms.
The first thing I wanted with my campaign was to actually be successful. It was most important to me to get my future app users input – as well as a way to get them on my email lists and make a little extra cash that will go towards marketing the app when it gets closer to being finished.
So, I started looking into what makes a successful campaign. Some things are universal – regardless of which crowdfunding platform you use – but others are more specific. As a for instance: Kickstarter is actually a bad place to run an app campaign, they have a low success rate but the other platforms are less well known so I still chose Kickstarter.
Setting a Realistic Funding Goal
There was one caveat to that, almost every campaign I saw raised about $250, even the failed ones. There are definitely the edge cases which raised much more than that. Also, most apps are trying to raise $10,000 plus, and I’ve only seen a couple of those funded. In general, apps seemed to raise right around $250, $0, or thousands of dollars, with the majority around $250.
So, I set my funding goal at $250, and ended up raising about $300 – just under $200 of that came from Kickstarter or referrals from Facebook, I had one friend back for $100 and my dad also backed the project.
Getting the Word Out
Another major thing I saw was the really successful campaigns all had marketing behind them – both paid and sweat equity marketing campaigns – and this translated into a drastically different funding amount.
I didn’t do any advertising until late in the campaign – and my advertising was done wrong, or at least aimed at the wrong people. I got a lot of clicks, but no new backers – I only spent about $30 on advertising on Facebook.
Other than that I only really posted to Facebook and Twitter, and not nearly as much as I should have on Twitter. So I almost had no marketing – who knows how much I could have actually raised if I had taken more time to plan that part out.
Oh Well, learn from the mistakes as well as the successes and move on.
Making it all Purty Like
Design is, and always will be, extremely important. Many people make decisions based on emotions, and design affects the emotions quicker than anything else.
I changed my design halfway through the campaign, and I think I would have been better off going with my final design first – I didn’t spend enough time thinking about this because Kickstarter doesn’t give you much in terms of options, but I could have created images for all the customized stuff I wanted to do – a lot of extra work but worth the effort.
Lookin Good on the Tube
Another big point I noticed was having a video – and the better the video the better the projects tend to do, but it doesn’t need to be professional quality unless you are doing a video project – and so I did put some time into thinking about my video.
I had a lot of ideas that would have made my video better, but in the end I had to settle for setting up my phone at my desk and doing a talking head vid. Not great, but better than nothing – except the video was like 12 minutes long, which was way too long.
I eventually broke the video into parts and put them throughout the campaign page, which I should have done at first to catch the first viewers of the video.
I also should have put some background music in, to keep interest just a little higher, just something soft to break things up just a little bit.
Rewarding Good Behavior
The rewards you give your backers is also incredibly important, as well as the pricing for each reward tier. Make sure that what you are offering is pertinent to what your project is – such as a copy of the app or maybe some form of physical item – but you need to be careful to not add too much more to your plate when it comes to delivering. Tshirts are cool, but if it will add an entire month to your delivery time is it really THAT cool? Probably not, but then again maybe it is. You decide.
People also generally like unique experiences – such as being a beta tester or getting something before others – so these make great rewards because they can generally require little extra time but provide lots of extra value to potential backers and users.
Putting it all Together
Now that I had a good idea of what I needed to do, I just needed to do it. I procrastinated a few things too long and had to settle – which negatively affected the campaign and lowered what I could have made – but next time I run a campaign I will have a better idea of what is important and how much time I really need to get things done.
Also, everything took about twice as long to accomplish as I had originally thought it would, so next time I will schedule my time a little better.
Now the campaign has finished and I am in the process of building my requirements from the users who have decided to participate in the discussion – less than the number I had expected but still several people.
Once that finishes, sometime next week I think, then I will work on designing the look and feel of the app with my backers help, then I can start to code something.
So there you have it. What do you think? Did I mess up big time or hit the nail on the head? What are your thoughts on the campaign page? Or something else you would like to see me try? Let me know in the comments below or join my email list below and send me an email, or email me on my contact page. Or you could shoot me a tweet @iOSDoug.
If you like what you see and want to keep updated, as well as be informed about when I release new freebies, sign up for my newsletter below for more tips and advice on growing an app business.
Hi all, this app store optimization checklist that I’ve assembled represents a really big part of the information I’ve been able to find – and test much of it – about ASO. Optimizing your app to be found organically through the app store search functionality is a really important step to take to get the downloads your app deserves. According to research done by Forrester, app store searching accounts for 63% of app discovery.
That means, incase you don’t want to do the math, a majority of apps are found, and subsequently downloaded, by being searched for on the app store. That also means, again with the math, 37% of app discoveries are through outside marketing efforts – ads, SEO, social sharing – so don’t think you can optimize your app page and get straight to number 1. ASO is really just to ensure that any marketing you use results in higher download rates after the campaign has finished – or you move onto your next project.
That being said, lets get onto the infographic. I hope you guys like it, I think it is pretty neat. ? (not to mention the technical difficulties I had while making it meant it took an entire day to create – re-created like 5 times)
Well, there you have it. A really great start for your ASO endeavors.
I do want to add one note to the end of this though. I really glossed over the app usage and retention block. The thing you need to keep in mind about this; even though Apple and Google do look at these metrics to see if your app is worth ranking higher, even if they didn’t look at this you need to spend some serious time on this part. You need to make your app totally freaking awesome if you want to actually make money with it. People don’t use apps that don’t work. They don’t tell their friends about apps that don’t work. And if they do, it will come back to haunt you.
So before you put the time into getting your app in front of more people, test the heck out of it. Don’t release something onto the store that is substandard. Before you can really rise in the charts, you MUST have an awesome app. So take the time and resources necessary to get the UX top notch.
And don’t underestimate the power of updates, I have gotten emails from people who weren’t sure if they should download my app, because it had been a few months since the last update. If I had one person email me about this concern, there were countless others who just didn’t bother to even try the app.
Your updates don’t need to be huge bug fixes or content upgrades – though bug fixes should be a high priority, and content upgrades are nice and keep people happy. They don’t even have to be a change in your code, just a new version number – though I’ll bet you can always find some small thing to actually update, even if it is just tweaking your analytics code. I would suggest updating at least every couple of weeks.
If you like the infographic and want to share it, I have included below some code you can copy and paste into the HTML of your site. Or share this post on your favorite social media site. Or you can contact me for possibly a guest post about it.
Last, but not least, did I miss anything? Any glaring errors you are just itching to tell me about? Or is there some cool information about my app store optimization checklist infographic that feel you need to share with the world. Do so in the comments – or shoot me a tweet @iOSDoug.
If you like what you see and want to keep updated, as well as be informed about when I release new freebies, sign up for my newsletter below for more tips and advice on growing an app business.
Why I Used SensorTower to Help Me Be Seen In The App Stores
I recently realized that I needed to do something. I had 2 apps in the store app stores – use this in a plural form because each country has its own app store, and I rank differently in each one. I was working on a third, but was seeing really crappy download amounts and was making almost nothing through adMob.
Needless to say, this is not what I had envisioned when I started my journey to become an app developer. I didn’t expect to be the next Clash of Clans, Flappy Bird, or anything else making an insane amount of money – but I did hope to make enough money to live off.
My apps fill needs that I know people have, and do it better than another apps I’ve seen that are similar. I’ve even received several emails, for both apps, thanking me for making them.
So I decided it was time to make a change. I needed to put my development time towards marketing. The only problem is, I am terrible at marketing. I understand branding, but getting myself and my apps out there was something totally new to me.
Thus, this website was born. I have decided I am going to do what it takes to get my apps in front of as many targeted users as I can, and while I do so I am documenting my successes and failures so I can help others in my former situation make the money they deserve with their mobile apps.
Which brings us to today’s topic – App Store Optimization. If you have been following me, you will notice this has been a major topic as of late. The reason is, ASO is something you can do today to get more traffic to your app in the app stores. It is also the first thing that I have done in my quest to more downloads.
I’ve written an overview of what ASO is, I’m writing an eBook right now, and am also giving away a pdf of ASO tools that I use, or have heard good things about, for free by signing up for my newsletter.
But all that information is fairly broad – even the eBook, as of right now, is fairly high level with some action steps included to help people get started.
So today I am writing a little deeper on what I consider to be the first and foremost important part of your ASO strategy – the part that will get the right people in front of your app, the people who want what you have to offer and are actively searching for it.
If you haven’t guessed it by now, I’m talking about the keyword research. Having good keywords is what will determine whether or not you show up when people search for you. Your keywords are the only real thing keeping you being found again and again.
Today I am going to talk specifically about my favorite keyword research tool, which has parts you can use for free, and other really cool things that you need to pay for – though you can get a free trial of them to check them out.
Also, the screenshots that follow are all for my app My Food Storage, incase you are curious. I intentionally didn’t show all of the keywords that I am ranking for, but I do mention a few things that I found – including specific keywords – later in the article.
Why SensorTower Is My Favorite Tool for Keyword Research
SensorTower allows you to connect your iTunes connect account so it can grab all of the keywords you are using in your app page, as well as actual download amounts and revenue from purchases.
It allows you to track how you rank for chosen keywords, as well as look at the likely keywords of your competitors.
It shows you how much traffic each keyword has – guesstimates only because the app stores don’t release actual search data, but these are pretty good guesstimates – and the number of apps that are trying to rank for that particular keyword.
This is great, because you can see what your competitors are doing, how they are ranking, and either use the same keywords, or similar ones with equal traffic but less competition.
In particular – and most other developers wouldn’t release this information even on pain of death – I found a keyword that was getting really similar traffic to a keyword I was already using – pantry – that had almost no competition – larder.
Now, on the iPad, I am ranked number 1 for that keyword. This helps me get in front of more people. I already knew the word larder, but had never thought to use it as a keyword, since most people don’t know what it means – btw, pantry is a more specific term for larder; pantry is an actual place whereas larder just means where you store your food.
Since doing my first round of keyword research I have close to doubled the number of downloads a day within a couple of weeks. While this isn’t a huge number of downloads, getting 186% the downloads is a big deal. I saw a 125% increase in downloads starting the very next day.
My downloads have been increasing, on average, since doing this. I have been moving up the charts on the keywords I rank for. Once my other strategies start to kick in, I should start seeing much more traffic, more downloads, and more revenue.
I’ve already seen a more than double increase in my revenue, and my keyword research was a big part of this – there are a few other factors as well, but they are fairly small.
Now, onto a little more about what you can do with SensorTower, and why I recommend them to other developers. These are broken up by the different sections of SensorTower’s App Intelligence interface.
App Profiles:
You can get a general overview of an app here, yours or a competitors. It shows you a big picture amount of likely downloads – a range of downloads that the app likely falls under.
The all time reviews, and reviews for the current version. When each review came in. The review history, broken down by country, can help you know which localizations you should focus on.
Estimated app worth – I’m not 100% sure what they base this information off of. And a list of related apps – so you can find its competitors and see how well they are doing.
Category rankings where you can see which categories the app has ranked in, as well as a graph of its ranking over time.
You can also see where and when you were a featured app – which country and which category. Currently Go Coder is ranking as a featured app in other countries, even though most of my downloads are from the US.
Sales Metrics:
You can track where your downloads are coming from, as well as where your sales are coming from. Again, useful to know where you should focus your localization efforts.
App Store Optimization:
Keyword Ranking is where you can check your apps ranking for different keywords – you can only add so many keywords on the free trial. This shows you not only your current rank, but the total apps ranking for that keyword, and whether you are moving up or down the ranks currently.
Next is the keyword optimization, where you enter the full name of your app, as well as the keywords in your keyword list.
This will tell you if you are duplicating keywords, if a keyword is too long, how many characters you have left, and any other potential keyword mistakes you might be making. You can also see how you rank for each of the keywords you provided.
You can do keyword research, very similar to the google keyword research tool, to see what kind of traffic exists for a certain keyword, what apps are ranked highest for it, and how difficult it will be to rank for that keyword.
You can also use the keyword spy from right here if you find an app you want to look at their possible keywords. More on that in a bit.
There are keyword suggestions, a paid feature, where you choose keywords you want to use as seeds to generate keywords from, and the tool will look for good keyword opportunities for you based on those keywords.
You can also translate keywords to other languages for localization optimization for other app stores.
The keyword spy compares your app, or any app you chose, against another app. Showing what their likely keywords are – based on what they are ranking for – and looks for keywords that are shared between the two apps, allowing you to get ideas for other keywords you might not have thought of. This is where I found larder btw, which is the very bottom keyword on the last image.
Lastly, you can track competitors – you can add multiple competitors to track – to see stats on them such as rankings, their ratings, and their last update.
There are also Enterprise features – for a paid enterprise level account – which I wont go into because I have not used them, nor do I plan to any time soon, since I get almost everything I want for free. I do plan on buying their monthly plan once I am making enough money to support such a purchase, because I have seen some pretty impressive gains since using them.
How I used SensorTower to Increase My Downloads
First, I put in my keywords list to optimize. I wanted to see how I was doing already. I found out very quickly that there were many keywords I was trying to rank for that I would never rank for – I had multiple keywords that had 10,000+ apps trying to rank for that keyword, and the keyword was only partially related to my app.
Once I found the keywords that I should cut from my list, I had a bunch of extra space, so I started using the keyword research tool to find other keywords that better described my app, while having much less competition.
Now I rank less than 200 for many of my keywords, and some of my keywords are even top 25. It is likely that this is where my downloads are coming from actually. Once I rank better for some keywords, I’ll start to rank better for others.
And each of the app stores is different. Each country, sometimes its a set of countries, has its own app store, with its own charts and rankings, so considering these factors can also lead to more downloads outside of the US.
If I can get a spike in traffic, from my online marketing efforts, I think I can get a HUGE boost in my rankings – I’ll post more information about that in another post when my online marketing efforts start to kick in a little more.
Well, thats all for now. If you have anything you would like to add, maybe a tool you use that you like more, comment below or hit me up at @iOSDoug to chat about it. I love hearing from y’all, so don’t hesitate to contact me about anything.
If you like what you see and want to keep updated, as well as be informed about when I release new freebies, sign up for my newsletter below for more tips and advice on growing an app business.
App Store Optimization: An Introduction and the Benefits
App Store Optimization – also referred to as ASO, because that is a really long thing to type out over and over – is a similar process to on site Search Engine Optimization. You can’t get backlinks to your app page – technically you can but that won’t help people searching inside of the app store to find your app. On a fundamental level, ASO is simply choosing keywords, making sure your app description and screenshots look good, and getting good reviews. For those of you who don’t like to read, BAM! you are done, go do something else. For those of you who want more information on doing your ASO, you are in the right place.
Just like SEO, ASO is actually a really deep topic. Sure there are the easy answers I gave above, but to really make sure your app is found organically by the people you want to find it, you need to put some real time and thought into your ASO, but first – we’ll start with the good stuff. You really came here to know what the benefits are right?
Me, Me, Me. It’s all About Me and my Benefits
If you haven’t already figured out why you need ASO, the biggest benefits from taking the time to do proper ASO means more traffic, higher conversion rates, and better user experiences. If you do all of the things described here, you can get all of these things. Have I got you hooked yet? Do you understand why ASO is important? If so, go on to the next section. If you need an example of what not to do, keep reading here.
When I launched both of my first two apps, I did very little ASO. I basically just followed Apple’s advice on what information should be in your description. I took screen shots of what I felt were the major parts of my app.
I picked keywords that described the app, but didn’t spend any time doing research into these, or jazzing up my screen shots. I also didn’t make app preview videos for either of them. Both of my apps launched, and due to being pretty good apps, that solve real issues that many people have, they both received a steady download rate, at first, of about 15 a day, then petering off to about 5 a day after a week or two.
Needless to say, this is quite underwhelming, though some apps don’t even do this good – usually because the app itself isn’t up to snuff. I recently learned not only how important ASO is, but how to do it correctly. Now I am going to pass this information on to you.
Ok, I Need ASO, But How Do I Make it Happen?
First off, pat yourself on the back. You have made an important first step in getting your apps in front of more people, who are more interested in your app to begin with. Now I’m going to show you the list of things you need to make sure are done right – and this might take some time, but oh man is it worth it! The checklist, in no particular order, is:
Hear that? Not ok, not even good. It has to be GREAT. If the app isn’t great, and people don’t have a wonderful experience using the app, then part 2 will be affected negatively. Also, I don’t know how much of this is true, but supposedly Apple and Google watch for usage signals in determining app rankings. And truthfully, whether that is true or not doesn’t matter to me, if the app is getting used once and deleted, then don’t expect anyone to download it, or to make money from it.
If your app is great, part 2 is easier to accomplish. If your app is great, and people truly enjoy using the app, they will share the app with their friends. You will get more users because those that already have it will sell the app FOR YOU!
Loyal users are worth their weight in gold, platinum, silver, $100 bills, and anything else precious you can think of. Not only will they sell this app, but probably get your future apps as well. You can only get this type of user with a great app. So before you spend time and money marketing an app, make sure it is great. If not, either fix it and make it great or just scrap it.
Another thing kind of related to your app being great that will help with downloads, though only in spikes, is to provide some way for people to share your app socially. Believe me, you can figure out a way for people to share your app in a positive way, increasing the eyeballs on your app, as well as creating a sense of community about your app. This is well worth the effort to help people tweet or share something about your app easily on their preferred social media platform.
Just having positive reviews will not only increase conversion rates – the percentage of people that actually download your app once they have landed on it – but people will already be excited to use your app before they have even finished downloading it. Their user experience is already better because of your reviews. If your app is truly great you will probably naturally get some good reviews, but this is unlikely to be enough.
People are looking for at least several good reviews, and a 4+ star rating. You need to make sure that the people who love your app are being asked to review the app. You also need to be putting effort into solving problems people have so they don’t leave bad reviews.
First, Asking For Good Reviews
You need to implement the good and bad review sections at the same time, so the “First” part of this is only because I have to start somewhere.
Pick a place in your app that people will have had to use the app extensively before getting to it. In Go Coder, this happens to be at the end of a tutorial. If somebody has reached the end of a tutorial series, they have spent a significant amount of time on my app, and probably have enjoyed it. Since they can get the first tutorial for free by tweeting about the app, they don’t even need to have skin in the game to get to this point.
Once they open the final tutorial in a series, I start a timer – 30 seconds to be exact – to make sure they have some time to read that page, it is just a congratulations page, before I put up an alert. In my alert I make sure to do a couple of things:
I ask them if they enjoyed the app and wouldn’t mind leaving a review. I make sure they know it will be quick and easy and provide a button to review which takes them straight there.
I have another button that is for people not interested in reviewing right now. This puts them back in my queue to ask again later.
I have a third button that links to my support stuff on the app – I have an email button, a Facebook page button, and a twitter button. All 3 options are easy ways for someone to get into contact with me and get help fast.
Lastly I have a I don’t ever want to review you button. This takes away the prompt and doesn’t prompt again. If someone clicks this they probably won’t give me a good review so I don’t want to ask them again.
Having the review button and the support button are must haves. Fixing peoples problems helps mitigate bad reviews, and asking for reviews from happy people increases positive reviews.
Second, Support Options That Are Easy to Use
When someone goes to leave a review, Apple has a contact support button that shows up. That is the last line of resort for fixing problems. By the time people get to write a review, they are already set on what they want to say.
You most likely won’t ever see that button clicked, but you might so it needs to be there and you need to have something legitimate on the other end of that button. I had an app that I left a bad review for because I clicked the button and went to the apps sales page, with no information on the page about how to get support. They got a worse review than I was going to give for that one reason.
You need to make it EXTREMELY easy for people to get in touch with you. Include email, support requests, social media links, ANYTHING that they could possibly use to contact you for help or questions or bug reports or even just to complain. This will go far in helping your rating stay positive and keep bad reviews out of your apps reviews. The more places people can find these options, the better.
Keyword Research and Usage
For those familiar with SEO, you will recognize this term, and even have a good idea where to start. You can use the Google keyword research tool to see exactly how many people are searching for, and how flooded the market is for, a given keyword. The only problem is that this only helps people looking for your app through Google. Not Google play, but straight up Google search.
Neither Google nor Apple release their search traffic information – nor do they release their search algorithms. So the best we can do is guesstimate – which you can use the Google keyword research tool to do – or you can use something like AppAnnie, or SensorTower, to do some research. The thing that is great about these tools is that, if you already have your app in the store, they can not only show you approximate traffic for your keywords, but can suggest keywords to use, and even show you where you rank for these keywords.
First you need a list of possible keywords to look into, so write down everything your app can do. Next, look for synonyms – words that mean the same thing – for each of these and write down any words that make sense, they won’t all make sense. Now look at how much traffic those words get, and how many apps are ranking for each of them. This can lead to some interesting nuggets of opportunity.
For instance, My Food Storage was ranking for pantry, because it tracks what is in your pantry. But a synonym of pantry is larder – many people don’t even know what this word means, literally: The place you store food, pantry is a more specific term for larder. Larder has, at the time of this writing, about 7 apps ranking for it. Talk about low hanging fruit. According to SensorTower, larder is searched for almost as much as pantry, but has almost nobody ranking for it. BAM! I’ve just increased my reach.
Side Note: Because of the nature of this site I am willing to tell you this information – nobody else will. Keywords are trade secrets. Revealing what keywords you are ranking for is a great way to have a competitor outrank you. That being said, the whole point of this blog and the training that will come through it is transparency, so I will release information like keywords, traffic, downloads, and revenue so that those following me can see exactly how well things are working.
Now that we have the research down, and have a list of keywords to use, we need to put them somewhere important. If you are an Apple developer, there is a keyword field to fill out when creating your app in iTunes Connect. Android devs don’t get this feature, but your description matters more than it does for Apple.
For Apple, make sure you use your keyword box to its fullest extent. Don’t do a singular and a plural version of a word, pick one – you will rank for the other. Don’t use spaces, they are unnecessary and cutting them out will almost certainly get you another keyword or two in your list. Use as many characters as you can, if you have more than 4 characters left, find another word that will fit – even if you don’t plan to rank for it, who knows what traffic you might get for it.
One place both stores have, is the title of the app. This place is super important to have your keywords, BUT Google is limited by number of characters to use, and Apple will reject your app if your title is keyword stuffed – it happened to me last week. They want your title to closely match the name that is shown on the screen of your app. So doing your keyword research before naming your app can be powerful – Sensor Tower even lets you see what keywords competitors are likely using and ranking for. Using a keyword as your name will be a powerful thing.
After you have your title and keyword box figured out, you need to make sure that your major keywords are also in your app description, but don’t focus on stuffing keywords in there! Write the description for your users and only add keywords if and when it makes sense.
Lastly, you can update your keyword lists, and title, whenever you submit an update to your app, and you should tweak your keywords each time. Look at your app’s keywords history, which keywords are you ranking well for and have high traffic? Pick your lowest performing keywords and change them out.
Screenshots and Your App Preview
Your screenshots, at least for Apple as I am not an Android developer yet, must be exact sizes of the screen for which you are uploading. Apple says not to add content to your screenshots, to just use straight screenshots, but it seems to help conversions to have a little description of the screenshot if you add a little to it.
Also be careful about putting the screenshot inside of a picture of an Apple device. Apple might reject such a screenshot. Also, as you can see from the screenshots I’ve included from My Food Storage, they can become outdated quickly – Apple stopped putting the little square in the home button with the iPhone 5. My suggestion is to not show anything below the bottom of the screen – meaning the area where the home button is. Apple is super protective about their image and will not hesitate to reject something that looks like an Apple product.
Take the time to make sure your screenshots look good. Hire someone if you need to – actually this is my recommended option but I understand not having money to hire out design work. Show off your app with your screenshots. Many people won’t read your description at all and will base their choice to buy solely on your screenshots, make them as good as you can.
I’m not aware if Google does App Preview’s or not – 30 second demo videos with your screenshots – but if they don’t, you should still do it and just post it to YouTube to possibly get some traffic to your app. Again, like with the screenshots, show off your app. You only have 30 seconds which is really not a whole lot of time, so pick the coolest thing your app does and record it. For Apple devs, you should have a mac computer already for the dev process so you can use quicktime to record your phone, or you can look up software out there on the Google machine to do this in an easier format.
Again, production value is key – though don’t worry about spending a ton of money on your video, just make sure it doesn’t detract people from wanting your product. Most apps don’t have videos yet, so having one can put you ahead of your competition.
App Description and Icon
Last but not least is your app description and app icon. The app icon is going to be the first thing prospective users will see. It needs to be simple. It needs to explain at least part of what your app does – between it and your title people should have a good idea of what your app is used for. It needs to help you stand out from everyone else. It needs to look clean – lots of things going on is a cluttered look that doesn’t help sell.
For examples you can look at my apps, their logos are both on the homepage of dougwatkinsdev.com, but more importantly I would look at what Apple and Android are doing with their icons. Look at the included apps on your device, and see how they look. You want your icon to look similar to theirs, but also noticeably different. If you icon looks EXACTLY like the iTunes icon, you will get rejected – people won’t know which app is which and Apple is SUPER protective over their stuff. You want to use the ideas behind their icons, not the icons themselves.
Pick 2 or 3 colors. Use straight lines. Don’t put much on the icon. Keep it simple and it will look professional and attractive.
The app description might be one of the last things you do, but it is still super important – anybody who has found you, seen your icon and title, looked through your screenshots, and is STILL on the fence will need your app description to convince them that this app is for them. Describe what your app can fix for them. What are your users experiencing that your app can help with or make better? Figure out how your users will be benefited by using your app then put these things there. The benefits of using your app need to come first. Then you can list features.
Lastly, make sure to include your keywords that make sense where they make sense. If they don’t make sense anywhere, it is probably a bad keyword to have – though not necessarily – but don’t force keywords into your description. It will be obvious and will drive people away. The app store does use the description at least a little to determine if your app is related to the current search term.
Now, using App Store Optimization, you should be getting better traffic to your apps, as well as give your users as much incentive as you possibly can to download your app.
Did I miss anything? Have something to say? What strategy have you used or seen that caused the biggest gains? Comment below and let me know! I look forward to reading it.
If you like what you see and want to keep updated, as well as be informed about when I release new freebies, sign up for my newsletter below for more tips and advice on growing an app business.
Brainstorming is an art, but there is some science that can be used to help you get better at that art. This is an interesting process, but a good brainstorm session helps get the creative juices flowing, so just stick with me here.
I remember the first time I had to use this in college, the teacher dimmed the lights, put on some funky music and grouped us up. We then spent almost the entire class doing most of this exercise. It was quite the interesting experience.
One last note before we get into this, the more people you have working on this at the same time the better. Different eyes see different things. Add to that the critiquing that goes on, and the ability to bounce ideas around, and you have a recipe for coming up with lots of good ideas, or at least more good ideas than you would on your own.
For those of you who have seen this article at inc.com, you will notice some similarities between this method and methods 8 and 9 in their list. If The Storm and The Bounce don’t seem to work to get any ideas – they really should get you plenty of ideas – then look at the other options in the list they have. You just might find something that helps get your juices flowing, which is really the goal of the first two steps.
The Storm
This is what I call the first part, and thus because it kind of feels like a storm of information. First, shut off all distractions. Close your computer, put your phone on silent and then put it away. Close the door.
Whatever you need to get away from everything for between 5 and 30 minutes – the longer you storm the more ideas you will have for later, though probably 15 minutes is ideal to put a time crunch on this and keep you from wandering mentally. Now take a piece of paper and a writing stick, try to stay away from digital notes because they offer distractions in and of themselves.
Start your timer, and write. Write anything that comes to your mind – ideas only, don’t worry about other stuff. Make a list, hopefully a rather big list. If you can’t think of anything, look around. Look at objects nearby. Think about what you ate for breakfast. Stare at your shoes. Think about how many cans of paint it would take to paint the room you are in.
Once you have some ideas flowing, it is easier to find ideas that might be more relevant. Just keep writing for your entire time. If you have anyone else doing this with you, they have their own paper, you are not sharing any information or talking at all during this part.
The Bounce
Now that your timer has gone off, it is time to bounce your ideas off each other. Go through each of your lists. What other ideas come to people as these ideas are read out loud? Write them down too. Everybody gets a chance to share.
Don’t hold any of your ideas back. The point of the storm and the bounce is to generate ideas, not critique them or toss them away, that will come next. Once you have generated a list of all of your separate ideas as well as bounce ideas – and you can take some time to explain each idea as you go – it is time to start cutting some of the ideas down to size.
The Critique
Ok, now you can let your inner monster out. Don’t hold back, though you should still try to avoid angering your team with your critiques. Vote on which ideas to consider further – if the group can’t decide, keep it around a little longer.
There will undoubtedly be terrible ideas on the list. Get rid of them first. Some people may have objections to getting rid of certain ideas – have a debate. Let them give their case for keeping it, you give your case why it should go. Then vote, you may persuade or be persuaded.
Don’t worry about getting to a single idea yet – for starters there may be multiple great ideas on your list – you need to take some time to flesh out the ideas that aren’t terrible first.
The Flesh
Now it is time to put some thought into how these remaining ideas might look. Similar to the bounce, you need to get everyone adding to the mix here.
Start with the first idea, and flesh it out – just a little. Things like target users, feasibility, usability, ability to accomplish the idea, will it be too much for people?
An example of the last could be inferred from My Food Storage. I had conflicting requirements, and one requirement – the time to add new items – was more important than the other – having lots of information available for each item – because the app would take too long to use, and people would delete it. Would you actually want this if it became a reality? Will anyone?
Answer these questions, and any others you can think of, and you will have a good idea of which of these ideas will actually work and be worth spending more time on.
The Critique: Part … again
Now you critique again. Now you need to trim your list down to a couple of really solid candidates. There should be more than one, hopefully, that sounds like it might be a good idea. It will have a target audience, it will be reasonable to accomplish, you will be able to get it in front of your target, it will solve a problem – and not just a problem you have decided they have but a real problem that real people really have.
Side Note: Apple is the only company I’ve seen that can convince people they have a problem that they don’t currently have. While you might be able to do this, it is extremely unlikely – you should read this as impossible – and will cost tons of money and probably fail. Stick to what works, which is solving a problem that people know they have. At least untill you have billions of dollars to spend on a product launch.
Make It Happen
From this point on, once you have a really small list of great ideas, just pick one to continue with. You can come back to the others after you finish the first one. But now is the time to get down into the nitty gritty of actually making the thing happen.
It might turn out during your process that you realize the idea won’t work like you thought originally. If that happens, scrap it and come back and pick a different one. You can’t be afraid of failure if you want to succeed. While failure is not a requirement of success, the ability to learn from failure, and not giving up, will ensure eventual success.
For more information on what to do from here, for those who want to create apps at least, see this post here for what to do next.
Did I miss something you think is super important about Brainstorming? Have a question about this? Leave a comment below, and I look forward to hearing what you have to say!
If you like what you see and want to keep updated, as well as be informed about when I release new freebies, sign up for my newsletter below for more tips and advice on growing an app business.
Great App Ideas: The Creative Process to Create Great Apps
Let me start with a story about coming up with a great app idea: Once upon a time, there was a Me – prepare for personal insight. And this Me’s name was Doug. Doug always wanted to make games, but realized in school that this didn’t offer the family lifestyle he wanted – something about sleeping at your desk for several months in a row when release time was coming up was a problem. So he gave up programming, which he loved to do, for a less overtime demanding career.
As he was about to finish school he was taking his senior project class – software development – and created his first iPhone app. He started making his own apps, but before he started he spoke with his team – his senior project team – about delivering their project to everyone through the app store. It wouldn’t work directly because of the way the first app was made, but the idea was a great idea.
So Doug went ahead with redoing the app. He spent several weeks before he even wrote a single line of code. He wanted the app to be great, not just OK or even good. He spent time thinking about the app, about what it should be – and what it shouldn’t be, and writing his thoughts down. He spent months developing the app.
He used the process that follows. And he feels really weird talking about himself in the third person like this.
The Creative Process for Great Apps
One of the things I learned, and I learned a lot, in my senior project class, was the importance of nailing the beginning of development. For those of you that code, you will probably have had times where you had an idea for something and just sat down and started hammering out code. You didn’t take the time, and I’ve done this too, to properly plan your project. You may have succeeded, you might have had to start over. This is not the way to create high quality apps. Below is my checklist for the creative process for creating great app ideas and apps:
Refine all previous steps – make sure nothing was missed
Make the app
[/list]
If you are not a software developer, this list will look a little cryptic – don’t worry I will explain it all here – but these steps are easy to forget, overlook, or just plain ignore. You cannot do this to create great apps – you may get lucky without it – but we don’t want our app development careers to be determined by luck do we? No, we want to stack the deck in our favor. We want to know that we will make back our investment in time and money when we make apps. This process is the beginning of the process of being profitable in the app store. Much comes after, and even during if you want a big launch, but that will be the topic of many other posts.
Brainstorm Your Ideas
Brainstorming is huge, so huge in fact that it will be its own post – coming soon -. But there are a few big points that can exist here. First – come up with many different ideas. Search the store for ideas. Look around your room for ideas. Write them all down – no matter how stupid it may seem right now, if an idea comes into your head for even a second, write it down. Do this till you have a large list of ideas. Then you can start researching these ideas. You are looking for things like:
Has the idea already been done? It’s OK, maybe even good, if others are doing this.
How many others are doing this? Don’t pick an idea that is already flooded, unless they are all really low quality.
Can you do it better than them?
Are these similar ideas selling? Do they have lots of reviews? Look for signals that the app is at least bringing money in. You want to make money don’t you?
Does it sound like something you would enjoy making? If you don’t enjoy the process, pick something else.
Is the topic of interest to you? Again, you need passion to make a truly great app. People can pick up on whether you have passion about the subject.
Is there a need that people have that you could fill? Why not make apps that make the world a better place? Fill a need and you will know exactly who to market the app to. This is my preferred method of finding great app ideas.
All these items are important to understand. Go through your list and pick a couple of really good contenders for the next phase.
Feasibility Research
This might seem like a weird phrase, but it basically means: Can it be done, realistically? How much will it cost? How long will it take? Will I make my money back? And maybe most importantly, will the platform allow it? By this I mean; Apple restricts access to many things that Android does not. If you want to make a 3 way calling app, you will either need to find a way to use VOIP to accomplish this or go to Android, because Apple will not let you access the built in phone app.
I found out the hard way after setting up My Food Storage to use SQLite to store data, but had always planned on using iCloud to sync between devices. A little bit of research told me something … SQLite creates little files while it is working, and if iCloud decides to sync while these files are being used – instant data corruption. After I had the app in the review process – Apple even approved the app – I had to completely rewrite my data persistence. This worked ok for me, but it could have been a really huge setback – the app took an extra 2 weeks to see customers, between my development time and Apple’s approval time.
All of these factors are important to look into when deciding which idea you should go with. By this point you should have an idea picked out to move forward on, though keep your list because you might want it for the next idea. For a more thorough post on feasibility, and ways to go about figuring out these points see my post here. – Coming Soon –
Requirements
There are two steps to the requirements, the draft and the research. These are possibly the most important parts of coming up with great app ideas.
The Draft
First you have to sit down and think of all the things you want your app to do. You can jot ideas for UI layout as well, but focus more on what functionality you want for now. I only include UI/UX if it is pertinent to the functionality, which is pretty rare – though ideas about usability are not rare. By this I mean requirements for including a menu or something similar – this is UI/UX, but it might impact a requirement you might have such as “Every screen should be available within 2 taps”.
Come up with every possible thing your app could conceivably do. Don’t hold back, because this is another brainstorming session here. You want the biggest list full of anything that might be possible, and probably some impossible things as well. Shoot for the moon, we’ll figure out what requirements to actually use later.
Just pick a time to sit down with your pen and paper, or tablet and stylus, and write. You should come up with a fairly large list of possible things to do in the app. Don’t worry about how you will make all this stuff happen, just get a list of things you think your app should do.
One other thing that is important here, before categorizing each item, is to decide what your apps purpose is. When I was designing My Food Storage, I actually created two sets of requirements, because my first set had contradicting requirements.
I originally planned to make it about having a years worth of emergency food storage on hand, and calculating what the user needed to purchase based on who they were storing food for, and what they had on hand. My other main requirement was ease of use, and more specifically the amount of time to add/remove food. It was vital to me to be able to add food in 10 seconds or less, once people got used to the app.
My initial requirements document had too much functionality. It took more like a minute to add an item, and when you have to add potentially hundreds of items, this is way too much to ask a user to do – though not necessarily to much for a business. So I had to go back and re draft my requirements, to cut out the now unnecessary parts – I had to figure out which parts were now necessary and not. This took time, not to mention that I was less than a week from putting the app in the store when I realized this and had to completely redo most of the app. I hadn’t spent quite enough time on my requirements document up front – though I had spent over a week just working on this.
So don’t skip the usability requirements, they may be the most important requirements you have. Usability requirements will almost always be Must haves in my list below. Though sometimes they are not.
Once you have the large list, start categorizing everything. My personal categories are:
Must have – the app needs this to function
Should have – the app could possibly do this, but it might not need to do it
Nice have – it would be really nice if the app did this, but it isn’t necessary
Wants – I want this feature, but it is totally extra and not needed
Can we have? – Is this feature even possible – research then put into a different category
You can create your own categories – for instance the line between nice and want is really thin, you might not need both. Once you have everything sorted, you know what you need to get done. These are the things you start on first when you begin coding. I also like to color code my lists, and underline each item with the set color. Making it easy to visualize my requirements.
Now you need to trim the list down – maybe. You need to decide which features that are not in the Must Have category that you will implement. You might decide that all your requirements will make it into the app, and this is just fine. The purpose of the requirements is not to cut out functionality, but to have a list of the functionality you need to implement.
The Research
Once you have your draft, you need to research your requirements one by one, to make sure that you can actually do what is necessary. Both that the platform will allow you to do what you want, and that you will have the technical skills to accomplish this – or that you will be able to find someone with the skills to accomplish this. Usually this doesn’t take much time, and you may have done some of this already during your feasibility study.
Once you know that you can do what your want to do – you may need to remove or edit requirements during this phase – you are ready to move on. We are getting really close to coding now.
Use Cases
Another term you may not be familiar with; Use Cases are documents you create that outline, step by step, what the user will experience – and what your system will do – when they do a particular action in your app. For instance, the step by step part of Go Coder, another app I wrote, would look like this: NOTE – there are documents out there to use as templates for Use Cases, but unless you take the time to learn how to fully use them, what I put down should be enough to help you or your developer make your app.
The User unlocks and reads from the HTML tutorial:
The user opens the app. The user clicks “Learn”. The app loads the Tutorial Type Selection Screen. The user clicks “<html>”. The app loads the HTML Tutorial List. The user pays for the tutorial, or the users tweets to get it for free. The user is prompted for their password, or the tweet box appears. The user enters their password, or verifies the tweet. The user waits for the transaction to complete, or the user sends the tweet. The payment buttons disappear. The user selects the tutorial they want. The app opens the tutorial screen with the selected tutorial. The user is now in the tutorial.
This shows you exactly what the flow of the app will look like for someone wanting to read an HTML tutorial, note that this is only for the first time they do this. Once the tutorial is unlocked the tweet/payment part will no longer apply. This is something you would also need to include in documentation to a developer doing this for you.
Now that we’ve done one use case, you need to figure out all possible use cases. Anything the user may want to do with your app should be considered. Sometimes you will have use cases that you won’t write out because they are so simple and need no explanation. But this is rare.
Once you have all your Use Cases spelled out, you now have a blue print for your entire app. You could hand this to a designer to come up with a wireframe, and then the wireframe and other docs you created to a developer and they can make the app for you.
But first, before you do that we have one last step to go over.
Refine
Now is the time to do it all again! Kind of. You need to look through all of these steps again to make sure you didn’t miss anything. In fact, when you are doing this right, you actually refine, and redo all previous steps, whenever you move onto and finish a step. This is similar to the waterfall method of development. If you find anything out of place, fix it. If you fix something, refine again. Keep going through the cycle until you have a product that you know will work and will have the desired user experience that you want.
Make it Happen
Now is the time to make it happen. Design your UI based on your requirements and Use Cases. If you can, test your UI – make a prototype for people to use. Does it function as expected? Do people get lost? Can they pick it up and understand what they need to do next? The user experience is a key thing to converting a great app idea into a great app. If the UX isn’t up to snuff, fix it. Find out what is wrong, or where people get stuck, and figure out how to make that part more intuitive. Hire a professional if you have the money – this is the best option unless you have experience with UX. Make sure that before you release your app people can figure it out quickly and easily.
Now it is time to code. Get it done, you already know everything you need to do, just make it happen now – or pay someone to make it happen. The coding should go much smoother with all this information in front of you. My suggestion is to start with your data model, then design the database or whatever you will do to persist data between sessions. Once you have this, you can start developing one screen at a time. Test it to make sure that it works perfectly, then move onto the next. Or just pay someone to do it for you. Either way, you are well on your way to a great app.
Did I miss anything? Is there something about coming up with great app ideas, so you can then make great apps, that you have experience with and want to share? Have a question? Want to say Hi? Please comment below, or send me a tweet @iOSDoug.
If you like what you see and want to keep updated, as well as be informed about when I release new freebies, sign up for my newsletter below for more tips and advice on growing an app business.
For all of you following me, I am currently doing a ton of research into marketing mobile apps to boost my own app downloads. Eventually this information, and my experiences with my experiments to increase users, will make it into some sort of training – some free and probably some paid, ok probably most free but who knows what the future holds. Either way, I came across this infographic that I thought was pretty interesting and applicable. Instead of doing an entire article about it, I’m just going to throw this up for those of you who are interested. I am currently in the process of putting almost all of this information into effect for my own apps.
The second half of the infographic is specifically what I am most curious to see how it affects my downloads. I have recently done some major ASO for my apps, and so we will see very soon how much impact it has on my download rates. Either way, hope this finds you well, and enjoy ?
What do you think? Good infographic? Bad? Indifferent? Are you even paying attention anymore? Leave a comment to wake everyone else up, or add your opinion about this to the interwebs to be here forever.
If you like what you see and want to keep updated, as well as be informed about when I release new freebies, sign up for my newsletter below for more tips and advice on growing an app business.
Looking to Create a Quality Phone App? Look no Further.
Everyone wants to know what they need to do to make a quality phone app, though this can apply to other software as well. There are thousands of new apps added to the app store every day. What can you do to get noticed in such a sea of options?
First, let me tell you what this page is not about. I am not going into the marketing/advertising/App Store Optimization of making a quality phone app, and these are all necessary things to get noticed. I am focusing more on the development and design aspects of your app. I myself am just getting really started with the marketing part of the process – something I thought was less necessary than it really is – so I can not as of yet inform you of these critical steps. BUT! I am working on it and will post some information on the subject once I’ve increased my downloads. I’ll post about each step and what my results were – that is a major reason for this blog actually.
Simplify the User Interface/Maximize the User Experience
Quality Content
Quality Code
Quality Imagery
[/list]
If you can look at the above list and say “Got It!” to all of these things, you are well on your way to making some money, or at least getting your app in front of a lot of people. If not, I’ll go through each option and give you some tips to help you create a quality app.
One other major point that applies to all of these steps, something I learned, you get out of it what you put into it. My high school auto shop teacher taught me this while we did body work on his pickup. Take your time, get it right. Of course after spending a year fixing his truck and doing all the body work to get it perfect, he decided to paint it neon pink – because he had a bunch of that for free – and did the paint job in about 10 minutes. The absolute WORST paint job I’ve ever seen, overspray, drips, and everything else you could do to make it look like crap, he did. Ruined a car in 10 minutes – but thats a story for another time.
The take away here is that these things take time. There is no magic bullet, or quick fix when it comes to quality, thats why quality is so desirable, it says to the recipient “Hey, this person really cares about this, they took a lot of time to make sure they got it right. Sounds like something I want to use.” And guess what, they would be right. Personally I feel that anything worth doing is worth doing right, so take the time to plan out your app, and these 5 parts of that process, before you start pounding out code or creating artwork. The results will certainly be better than if you don’t.
One last thing before we get into it, don’t skip any of these steps. Skipping a step will almost certainly lead to crappy quality, and thus angry customers or no customers. That truck looked better covered in Bondo than it did after a slipshod paint job. Up until then people saw that and said “He really wants that truck to look good”, after the paint job the best responses were “He must have been drunk when he painted that”, all because he skipped the last step of doing a quality paint job – even the color could have been overlooked if he had done a decent job with the paint.
Have a Great Idea
Step one, and the one step I can’t really help you with very much, is to have a great idea – not OK, passable, or even a good idea. If you come up with something that is mediocre – you will get, at best, mediocre results. If you want to make an app that NOBODY will use, then … well … nobody will use it. Before you take the time to do everything else, ask around. See if the people you know will actually use such an app.
It’s ok to develop a phone app for a small audience, just understand that you will only every be used by people in the audience you develop for, so make sure you really want to get in front of a small group before you say yes to such an app.
If people you know do like the app idea, refine it as much as possible. Get peoples opinions on what should be in the app. If multiple people request a certain feature, you should seriously consider adding it – along with this goes learning what your platform is capable of, Apple limits what a developer can access, so many things that are possible on Android are impossible on Apple.
Once you have a refined idea, sit down and write up your requirements – which features you will need to implement. Also write down a list of cool features you want to look into and see if they fit in your scheme. Lastly, think about your goals for your phone app.
An example is with My Food Storage – which I wrote. I wanted the user to be able to add an item in less than 10 seconds, this was an important metric for me, which meant that in the long run, I needed to do some serious trimming to my features. I wrote the app, had it almost finished, and then had my family test it.
I realized I was at closer to a minute to add a food item, unacceptable since most people have hundreds of items to add. So I had to go back and cut away many features, I had to decide what was truly important and what was nice, and keep only important things.
Another example of this is in relation to my app Coder. I was browsing my preferred news site, and saw an article about an app to learn JavaScript, intrigued I downloaded the free app and played with it. The first tutorial was free, the second was free with a social share, the others cost money. They had a pretty good set of tutorials – a little slow for my particular taste – but they didn’t have anywhere to test the code.
You couldn’t learn something and immediately put it into action. I’ve used codecademy.com before, and you learn and code at the same time. Plus from personal experience, I don’t actually learn programming concepts until I’ve actually used them, sometimes not until I’ve used it several times.
This seemed like a fundamental flaw in their good idea for an app. So I created my own app. First as a proof of concept that people could create HTML, CSS, and JavaScript files in a project folder and then run them on the device. I also was interested in learning Swift – I had done only Objective-C till this point for iOS apps – so I taught myself Swift while creating this app, in a week, working 3 hours a day max.
This ended up being incredibly simple, and yet within 24 hours of releasing it – with no marketing – I had received multiple emails from people thanking me for making the app. I haven’t even published the real reason I made it in the first place – a set of tutorials that you could read and then instantly put that knowledge into action, without any network connectivity or a computer in front of you.
My analytics on the app is weird, so I’ll be replacing it, but from my ads being displayed, I know people are using that app a lot. Some people are finding a real use, because I saw an opening and an opportunity. I saw an app that was performing, and made – at least in my opinion – a better version of the app.
Coming up with great ideas that fill a real need for users is the first, and possibly most important, factor in creating a quality app.
For more information on coming up with great app ideas, see this post.
Simplify the User Interface/Maximize the User Experience
UI and UX go hand in hand, developing one is developing the other – though not always in a positive way, but they both impact each other. UI is probably the biggest design decisions you will make. The code/features design decisions are probably the only bigger ones.
The reason functionality is higher is because those requirements are needed before you can design your interface. The reason UI is second is because this is what your users see and interact with – the interactions being the UX part – and so if your UI is poorly designed your users will feel it. Proper UI design also ensures all features are accessible. What use is adding a feature, and its required code and testing, if you can’t even get to that feature!
UI is the controls and visuals you put on the screen, the UX is what the user feels/thinks/loves/hates/connects with while looking at and using your UI. A simple UI generally improves the UX. Think about an app with 100 different options in the menu. That would be extremely overwhelming. Now picture the same options shown as 5 options – this would be like having sub menus for instance. The user opens the menu and only 5 things to choose – no more users deleting your app because it is too complex.
It doesn’t stop here though, because simplifying won’t necessarily do it. Your UI needs to be simple, but also intuitive. People need to pick up your app and within 10 seconds, know how to use its basic functionality – which should be 80% or so of your app. If they can’t figure out the basics without help, you need to simplify.
There are always edge cases – cases which are unlikely but possible – with this. You don’t need to worry about edge cases – such as 90 year old grandmas – being able to do this with your app, you include help, tutorials, and FAQ’s for them to get up to speed.
I personally use my parents as my test for the intuitiveness/simplicity of my designs. If my parents can figure it out on their own, then the majority of people can do the same. Understand that my parents aren’t stupid, or technologically slow, but programmers they are not, and so they don’t have my understanding of technology either. I guarantee you know somebody that would be perfect for you to use as a usability tester.
There can be uses of your app that people won’t just know they can do, and that is ok too, as long as the core use of your app isn’t lost to those who don’t know these secrets. Something like Apple’s mail app, you can swipe right to mark an item as read. I didn’t know this for over a year, but I still knew how to use the app’s core features.
That being said, I would include a place somewhere – maybe on your website – where people can go and see all the cool, quick access features that aren’t obvious. Include the obvious ones too so that your edge case users can find all the help and instruction they can want, without needing to email you for help.
The take-away here is to make sure that people can open your app for the first time, and very quickly understand how to use it.
Quality Content
What you put into your app has to be top notch quality itself. How can you expect to have a quality app if any area of your app is not high quality? Going back to the beginning, you get out what you put in. The quality of your content will sometimes be determined by the quality of your idea. But sometimes you will do something like my Coder app, which has content that I have created – namely tutorials in this case – which are added to the app.
I spent a large amount of time researching what information was important to include in my tutorials, changing the ordering of information – sometimes it didn’t make enough sense because you needed to know something else before getting to a certain piece of information – and working on the pacing of the tutorials. You also need to take the time to do your research and fact checking, make sure that what you put into your app is something that people will want, and will want over and over again.
I tried to avoid really long tutorials – meaning I had a set amount of content to cover, but didn’t want an individual tutorial to be too long. I wanted it to be as easy to read as possible, but I still needed the information to be there and be quality information.
This means you need to have adequately researched your content – it needs to be correct – and take the time to create flow in your content, and between your content and other areas of your app. Make sure people can get to what they want in a way that makes sense. Your content should be in line with your apps goals and intentions – this is images, words, and functionality – don’t put obscure references to something that has no bearing on the app.
An example from My Food Storage app could be: Adding a link to purchase a baseball bat on Amazon when the user pulls up their grocery list. This has no bearing on my app – if I really needed to add some sort of affiliate link there, adding a link to something like a crockpot or a grocery delivery service would make sense, and could add value to my app for my users. Everything in your app should be adding value to your users, and value they would expect and want.
All of your users should understand your content, don’t use slang unless the target audience expects it – such as an app for teenagers. Don’t use euphemisms or cultural references – again unless your audience expects it – as this can be confusing, especially for someone who is from a different country or culture. An example would be saying “You hit it out of the park” because this is a distinctly American phrase, and someone from a different country might have no clue what you mean.
Spell things correctly. Use proper grammar. This effort is sometimes missed, and can lead to instant uninstalls – because it makes you look like an idiot. This one thing can make you look stupid faster than anything else, so take the time to not only run spell checks on your content, but proof read everything else afterwards – they’re, there, and their are not the same words and will make you look extra stupid because you don’t seem to know how to use the english language properly.
Dont steal information or content – images, videos, articles, ANYTHING! Apple can reject your app for doing such, and even if it gets by them, you lose trust with your users. If you use open source stuff, or content with permission of the owner, don’t forget to attribute properly. Some people don’t care for attribution, but some care mightily. Don’t upset your sources by forgetting to attribute them to the information – somewhere in your app.
Quality Code
This can be harder for some people to spot or know if their code is quality. The first item here is make sure it runs. Go through all possible uses of your app, anything anyone can think of to do, and test for it. Get your app in front of as many test users as possible. Make sure that when you sign your name to it and submit to Apple that you have tested as many possible uses as you can think of.
Don’t EVER let your users beta test your app – by this I mean, don’t just put it in the store and let your paying customers be the ones to find your bugs. If you have a beta run you want to do, this is different – just don’t do it in the store.
We all have bugs in our code – even projects that look bug free have bugs, they just haven’t been found yet. There are so many variables in what could cause a bug that you could never write bug free code, but take all reasonable steps to get rid of as many bugs as possible. I read somewhere once upon a time that if you can get your app in front of something like 6 people you will find 80% of bugs – I don’t remember where that information came from to quote it directly, only that I learned it while doing my Senior project – a software engineering class at uni. So make sure you have several people help you test. Not only will you find more bugs, but you can also test the UX of your app while at it. The more you can test your code, the better its quality will be.
Also do other things like commenting your code, so that you understand what is going on when you come back. Removing old code you commented out to test something with. Formatting your code properly. Using proper indentations and naming conventions. Be consistent throughout your projects in your naming conventions. Learn the proper way to use the tools you have.
One thing that can help with code quality is to find open source projects that perform part of what your app is. You can’t just take an open source project and label it as your own and post it straight into the store, but an example from my My Food Storage app is the barcode scanner I used.
I don’t have the skills, actually experience would be a better word, in image processing to make my own barcode scanner. So I found an open source project and included it in my project – which required some customizing of their code on my part – and then added the entire license definition and links to the open source documentation within my project. I made sure everyone knew that I used a specific piece of code for that, plus I didn’t have to worry about writing and testing that – other than making sure it worked within my app.
If you can code in pairs, this helps code quality go up significantly. If you can’t, but can have a friend look over your code – after comments are thoroughly implemented – then you can likewise increase your codes quality. More eyes see more bugs.
Another development convention that can increase code quality is learning to use OOP and OOD principles – if you don’t know what those are, google them and begin to learn because these are must knows in the mobile app development world. Specifically I am thinking of code hiding, and using classes properly. If you can create a class that performs a set of functions, and you can test that class completely, you can use it in other projects and know that it works. Also, you can know that the code within it works right. Test each function on its own, then you know you can trust its output.
Being able to test each function on its own goes a long way toward high quality code, because you leave out the possibility of weird edge cases causing code failure. Hiding properties and some methods inside of a class also keep code cleaner, making sure that another class can’t try and do something stupid with your code. You may think you don’t need to hide code from yourself, but doing so creates cleaner code that is less likely to introduce bugs.
Quality Imagery
Part of this is under the quality/simple UI, but you will have all sorts of images to use – buttons, backgrounds, thumbnails, etc. – and these all need to be as high of a quality as you can manage. This doesn’t mean you need to hire a graphic designer, but if you can afford one then you should.
Imagery helps to inform the user – it can even cross language barriers – and thus is super important. When people look at something for the first time, their eyes first go to images. After they absorb the image a bit, then they will start to look for words. So if your image can tell the users what they need to do, then your app will be that much more intuitive, and users will be that much happier.
Learn to use Gimp and Inkscape to create your own graphics. Or if you have the money, invest in Photoshop and Illustrator, there are more opportunities to learn these than the free options. Either way they need to look good.
Don’t settle for almost good because you are tired or frustrated with your tools. Take a break and come back after you are less stressed. Along with images used inside the app, your app icon is incredibly important. It should be simple, and tell people what your app is about. It doesn’t need to tell this on its own, but between the title and the icon users should understand your app’s purpose.
Sometimes you can find images that work for you project on the internet. Just make sure you don’t just google something and grab images, this is stealing most of the time. You can use Google to find free images. Know what the license is for any image you choose to use, and that you follow the license terms. Some images require attribution – telling people where you got the image – and some require that you don’t edit the image at all. Find the license information for any image you want to use, and follow their terms strictly, or you could be in trouble.
Also, something that is important for phone apps is to only use appropriately sized images. Don’t scale images in a phone app, it will be noticeable and does not look quality. No matter which way to scale the image it will look pixelated. We are well past the 80’s and their associated 8 bit images. That being said, you can create games with the 8 bit image style, as long as it is a choice and you still make sure your images are appropriately sized.
Trust me when I say that this is an extremely important step. It can take a good looking image and make it look like crap. On iPhone you can name your images appropriately and the app can select the appropriate size based on which device is running the app.
Your app’s icon is another super important piece of imagery. Users need to see your icon and have an understanding of what your app is about. Your icon needs to make sense. It should also be the highest resolution you can make it. Vector images are really best for creating an icon, since they scale perfectly within the editor to create pixel perfect icons. Your icon also needs to be unique. It should stand out on all kinds of backgrounds.
Generally, simpler is better when it comes to icons – games are about the only thing that can get away with really busy icons. Apples icons are a great idea place for icons. They are simple, usually one or two colors, and you understand what the app is about just by looking at the icon.
In the end, my final test is “How does this look?” Will users see this and say, “Hey, I like this.”? If not, you still need to refine, or go a different direction.
Go and Do
Now you have an understanding of what are 5 crucial areas necessary to making a quality phone app, so go and make something awesome. I’ll be posting later with some advice for marketing your app and getting it in front of people – both things I did on accident without understanding and things I have learned since that are important.
What other tips do you have for others reading this about improving the quality of your tablet and phone apps? Comment below to let me know if I need to update my post.
If you have any questions for me about this post, or anything else related to app development, please post a comment down below or send me a tweet @iOSDoug. I look forward to hearing from you guys.
If you like what you see and want to keep updated, as well as be informed about when I release new freebies, sign up for my newsletter below for more tips and advice on growing an app business.
If you like what you see and want to keep updated, as well as be informed about when I release new freebies, sign up for my newsletter below for more tips and advice on growing an app business.


 I recently decided to use Firebase to do authentication and database storage for a few apps I am working on. Both for myself and some freelance clients. Firebase was my choice for three reasons:
 First I started working on the sign in screen and user creation screen.
 Testing the Account Creation
 I recently finished a
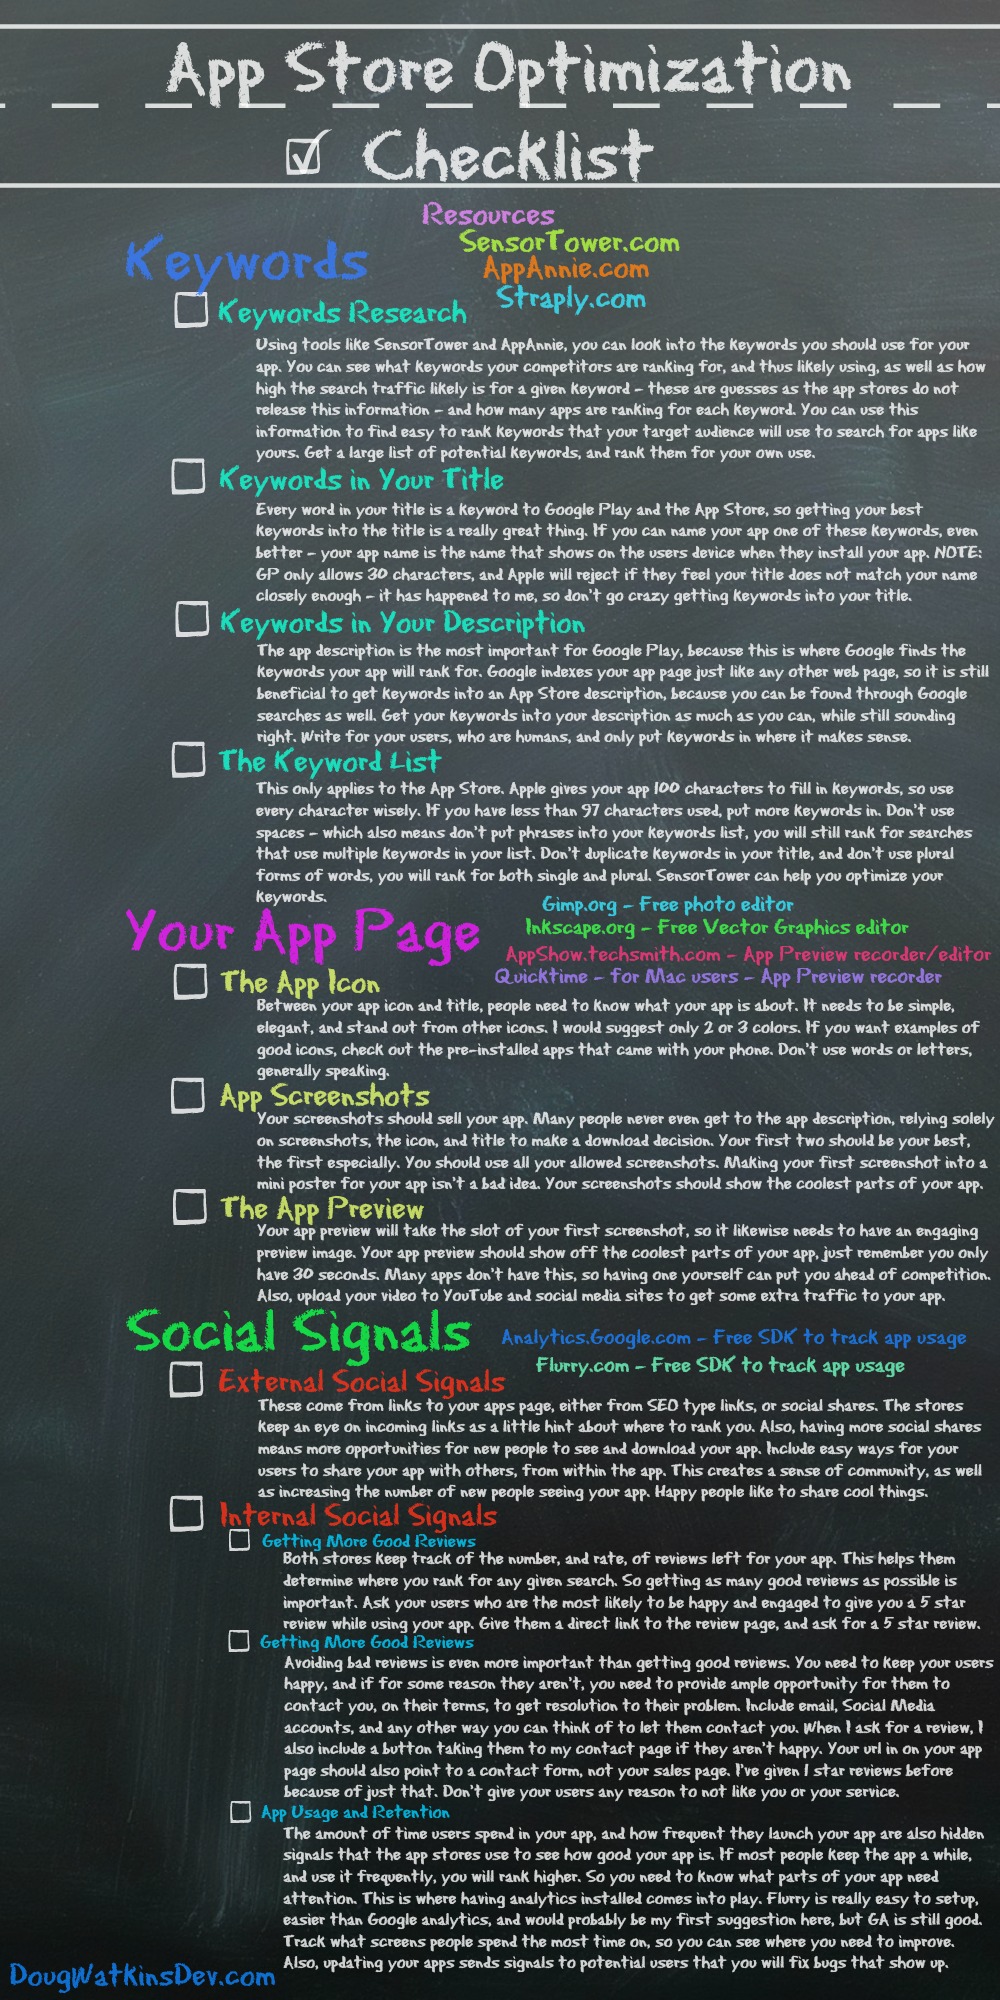
 Why I Used SensorTower to Help Me Be Seen In The App Stores
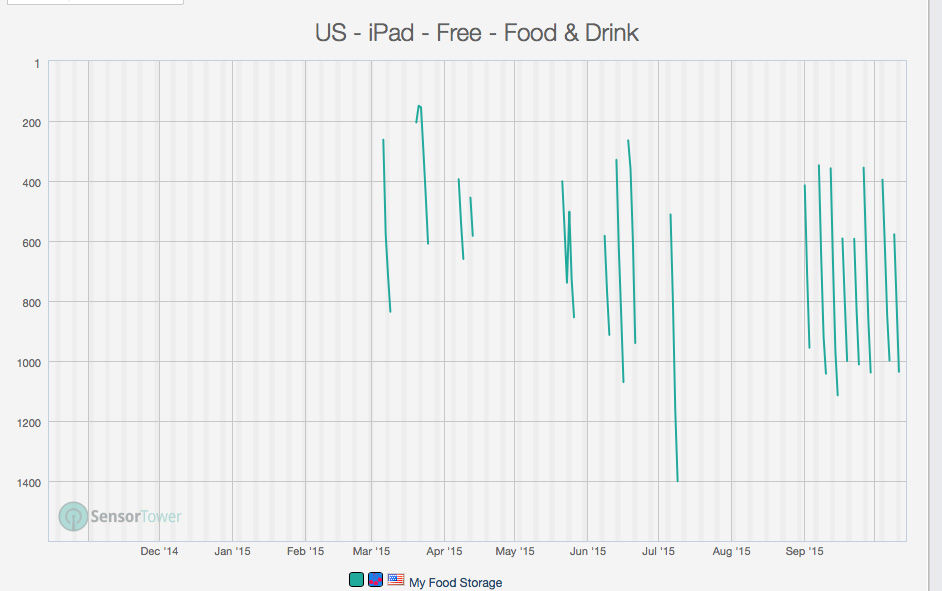 SensorTower
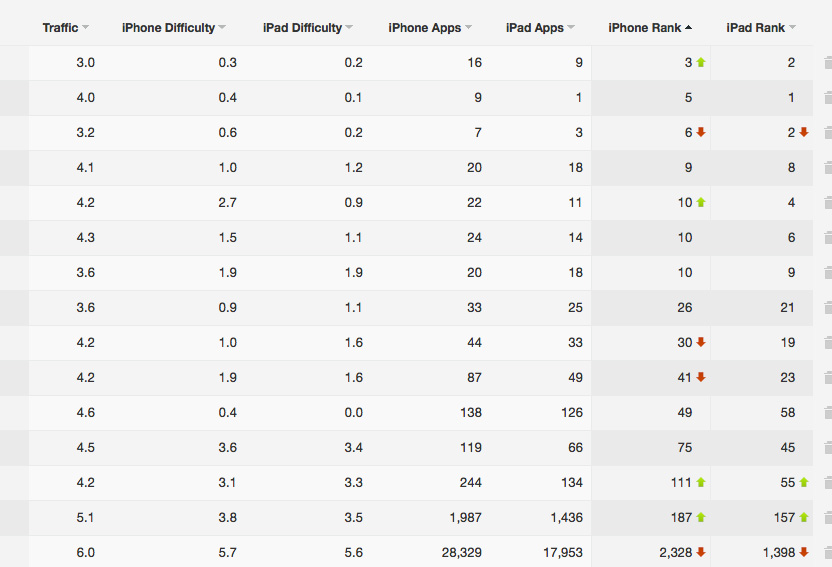 Keyword Ranking is where you can check your apps ranking for different keywords – you can only add so many keywords on the free trial. This shows you not only your current rank, but the total apps ranking for that keyword, and whether you are moving up or down the ranks currently.
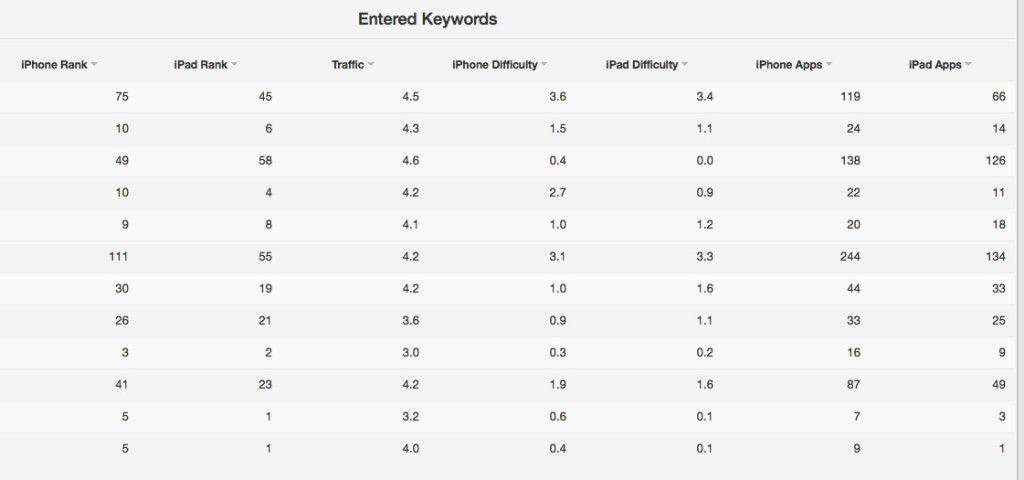 First, I put in my keywords list to optimize. I wanted to see how I was doing already. I found out very quickly that there were many keywords I was trying to rank for that I would never rank for – I had multiple keywords that had 10,000+ apps trying to rank for that keyword, and the keyword was only partially related to my app.
 App Store Optimization: An Introduction and the Benefits
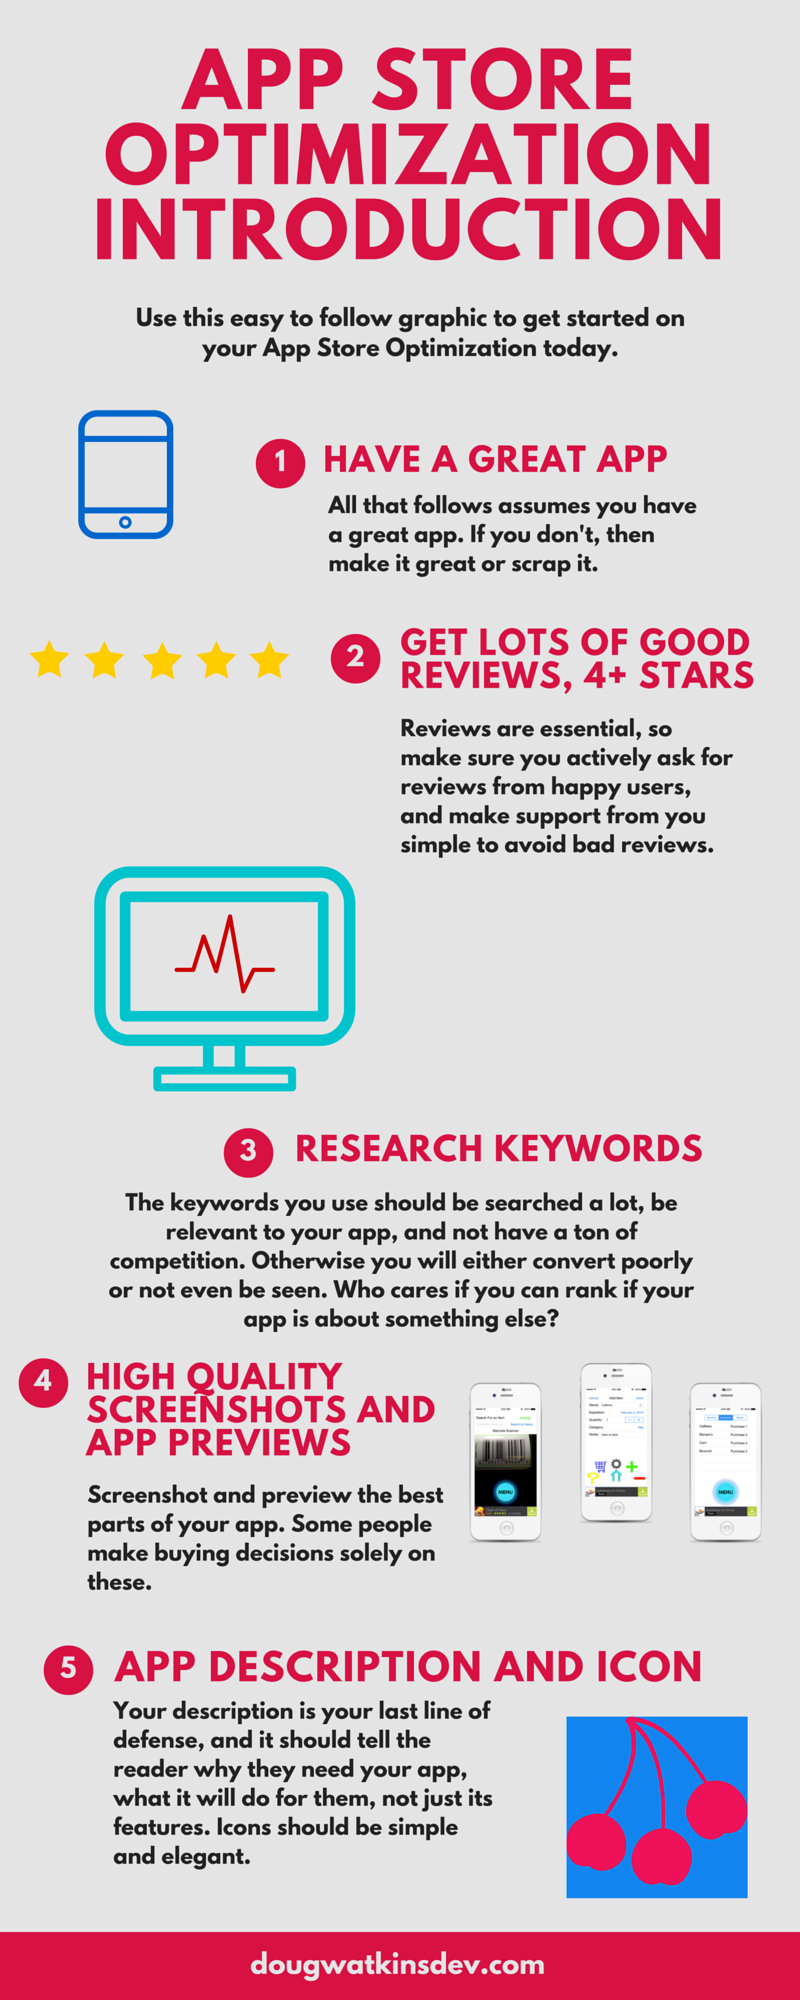
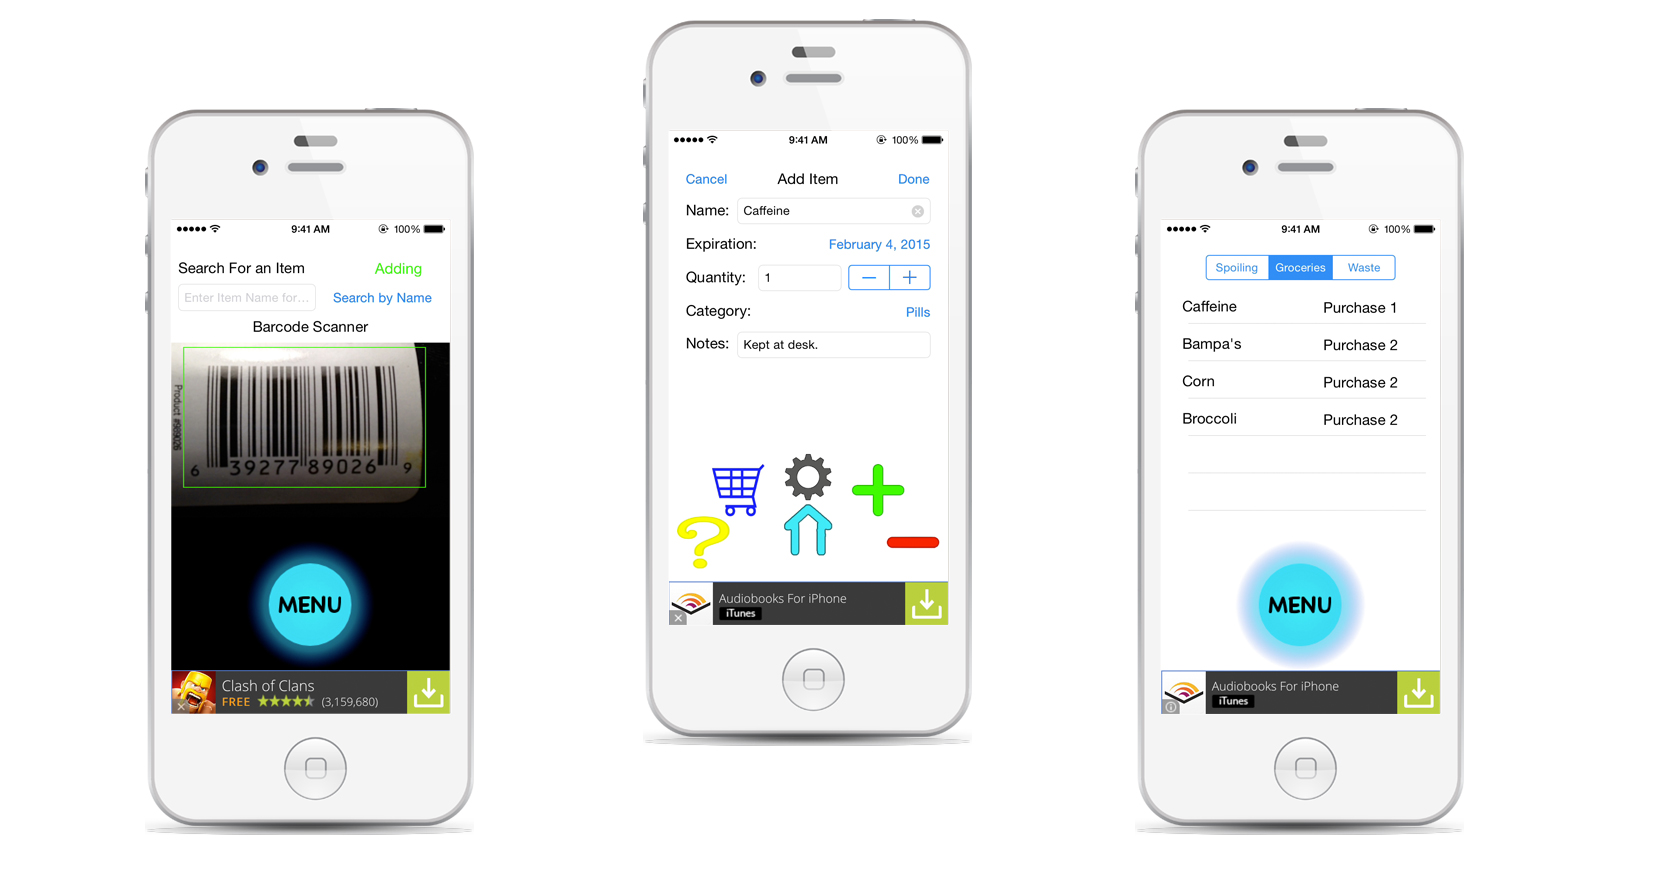
 Last but not least is your app description and app icon. The app icon is going to be the first thing prospective users will see. It needs to be simple. It needs to explain at least part of what your app does – between it and your title people should have a good idea of what your app is used for. It needs to help you stand out from everyone else. It needs to look clean – lots of things going on is a cluttered look that doesn’t help sell.
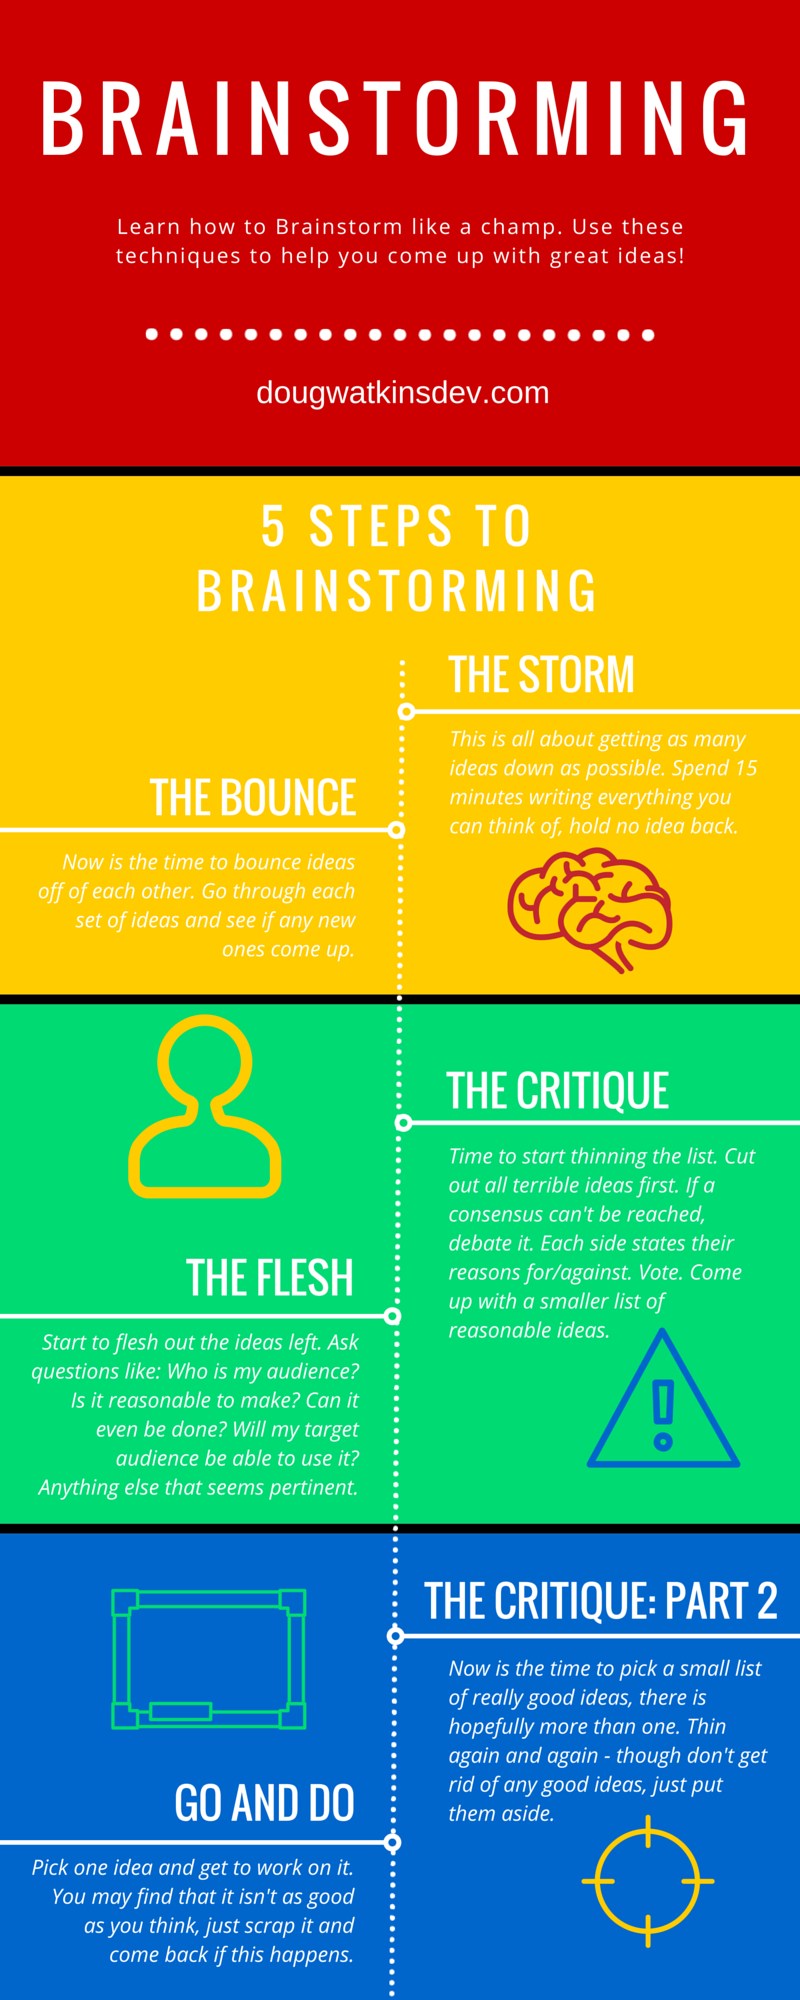

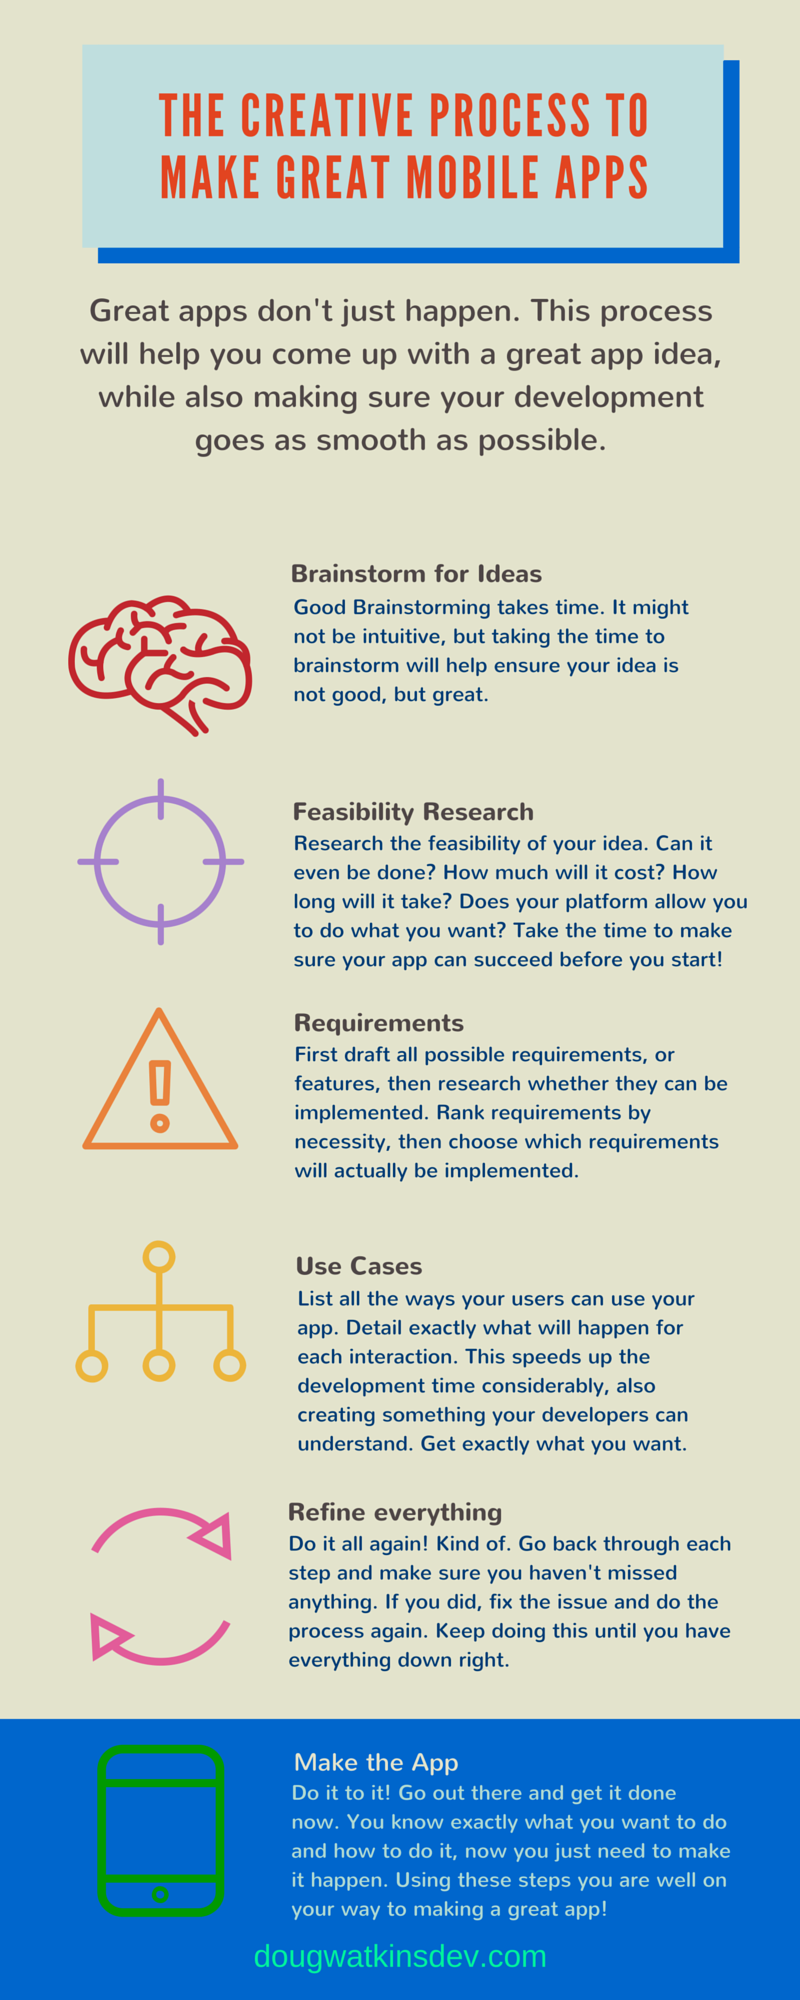
 Brainstorm Your Ideas
 Requirements
 Use Cases
 Refine
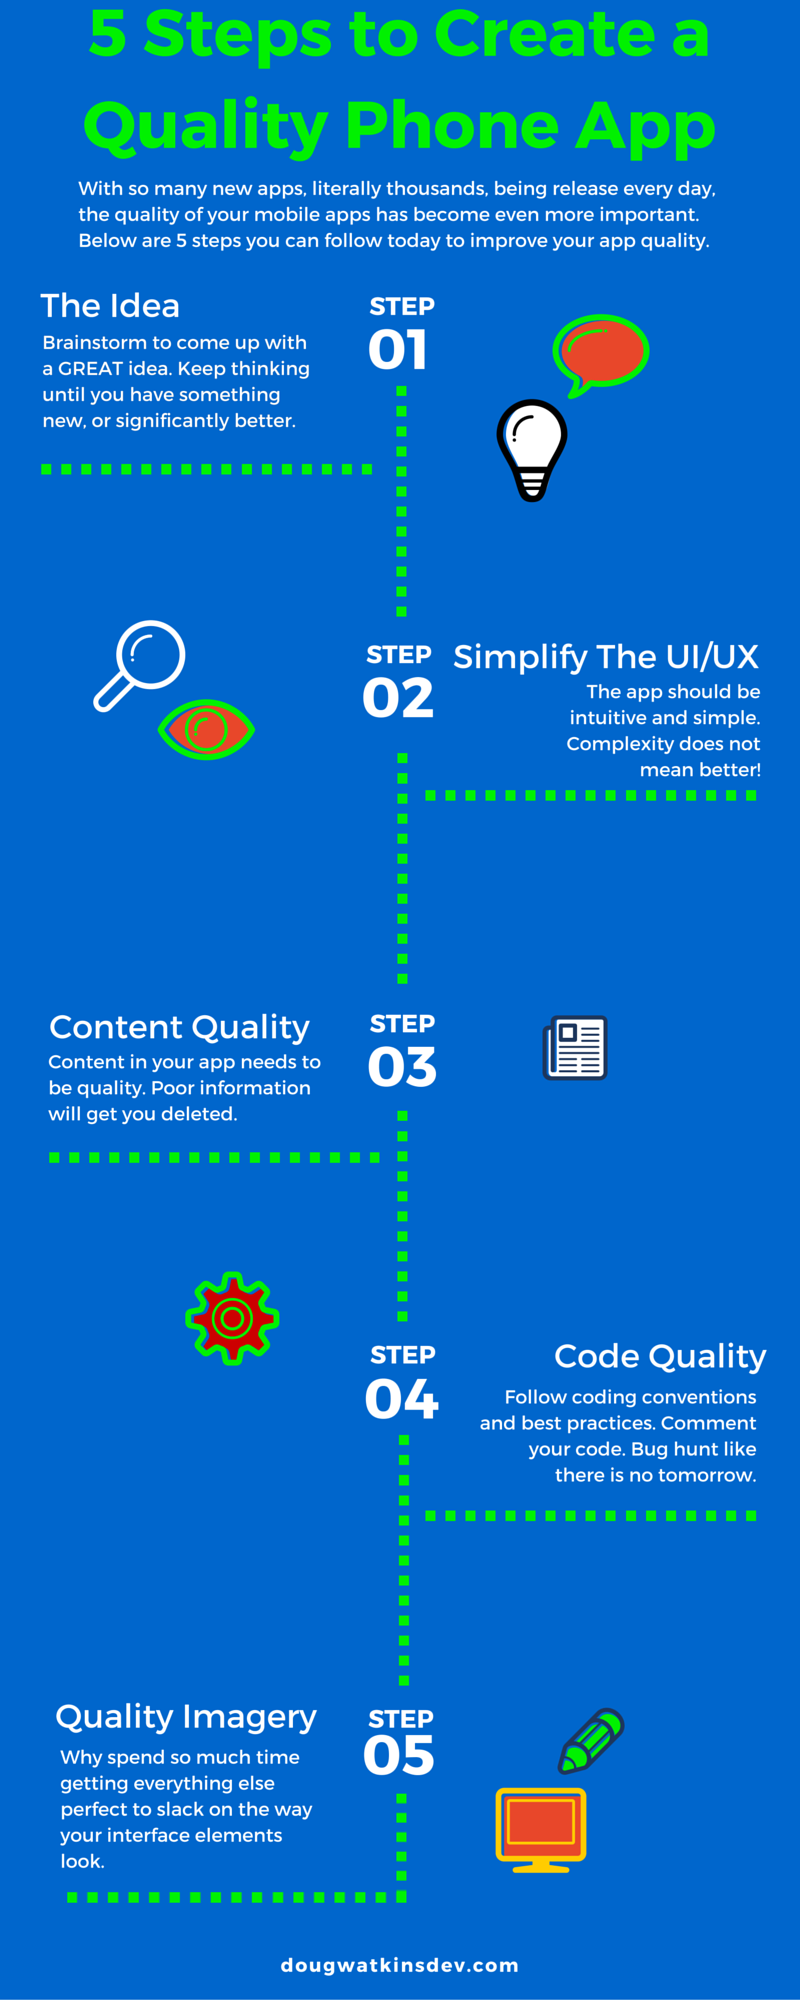
 Have a Great Idea
 Simplify the User Interface/Maximize the User Experience
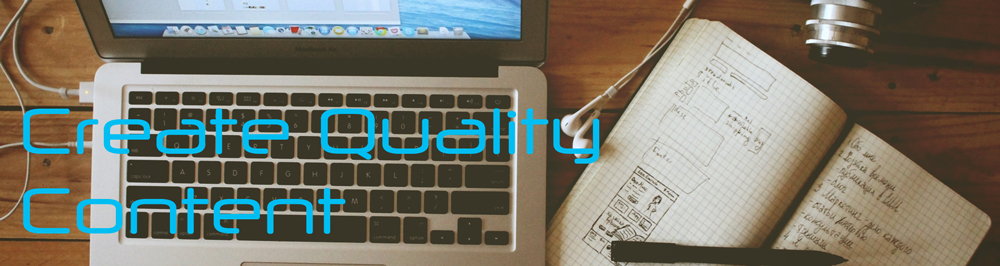 Quality Content
 Quality Code
 Quality Imagery
![[Google]]( https://dougwatkinsdev.com/wp-content/plugins/easy-adsense-lite//google-light.gif)
